Category Archives: Uncategorized

How to create a new Virtual server instance for VPC in IBM Cloud – Step by Step Guide

In this step by step guide we will create a new Virtual server instance for VPC on IBM Cloud. The creation of a virtual machine under this new option tends to be more complicated than creating a simple virtual machine in the Classic Infrastucture. Let’s get right to it.

Prerequisites

There are number of prerequisites that need fulfilling before the actual creation of the virtual machine.

Create an SSH key pair

The virtual machine will be created without a root password. In order to be able to log in to your new virtual machine you will need to use an SSH key pair which is to be generated manually.

We used an Ubuntu linux session to generate a key pair for the root user by executing the following command:

ssh-keygen -t rsa -C “root”

Generating public/private rsa key pair.
Enter file in which to save the key (/root/.ssh/id_rsa): /app/root
Enter passphrase (empty for no passphrase):

Enter same passphrase again:
Your identification has been saved in /app/root
Your public key has been saved in /app/root.pub

This procedure generates a public and a private key. We named the public key file to root.pub and the private key was automatically saved as root.

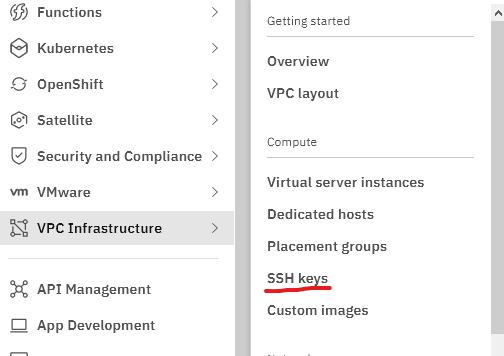
Open IBM Cloud in your browser and navigate to the SSH Keys. VPC Infrastructure -> SSH keys

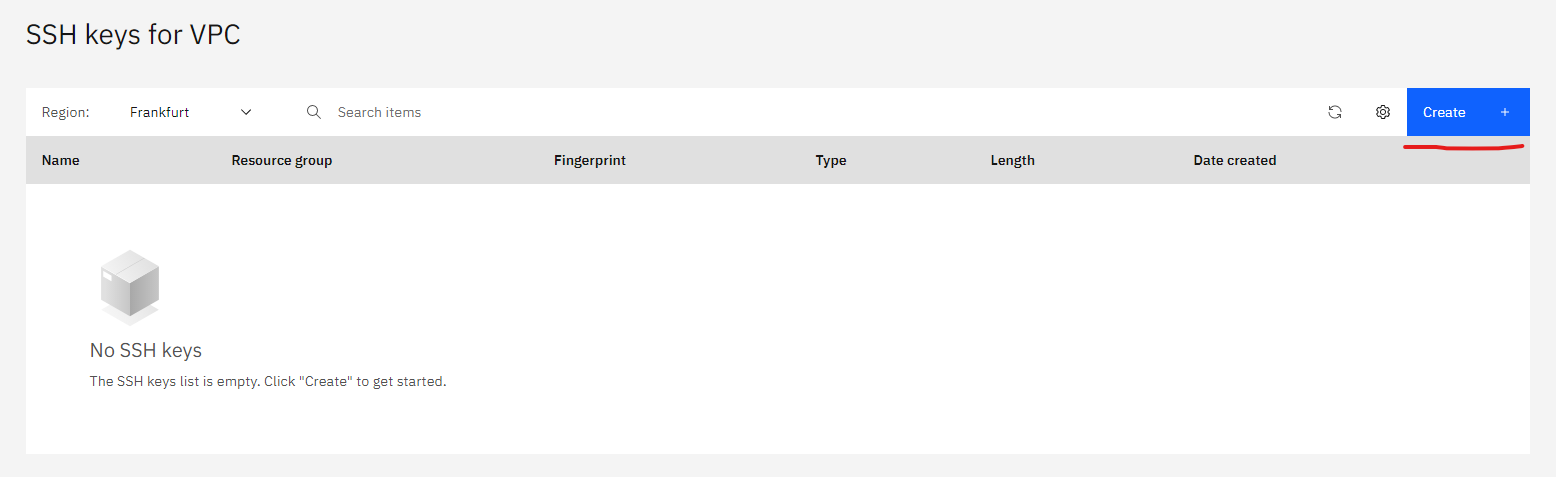
Click on Create at the SSH keys for VPC screen.

Fill in the information at the next pop up window. Name your certificate and copy paste the public key into the text area in the bottom ( we won’t show that ). If you filled in all the details correctly the Create button will turn blue. Click on that button to continue.

If you face an error here stating that the certificate is incorrect it might be that you tried to copy it across from a Linux shell by cat-ing the file. Open the public key in a text editor and copy it across from there.

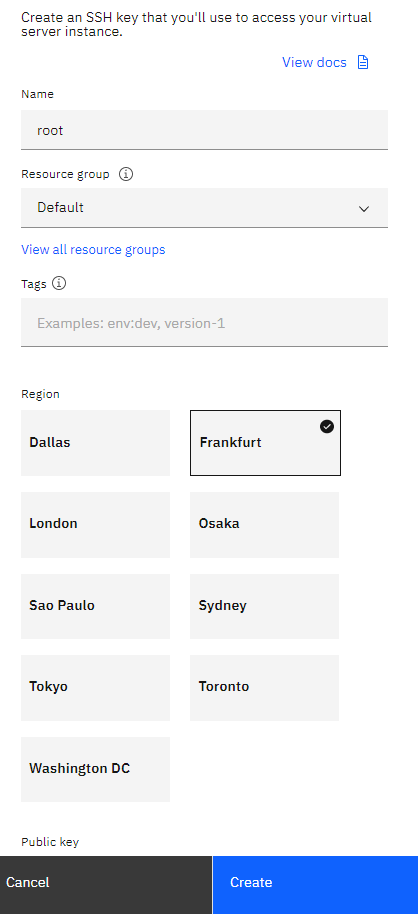
Once you have created the ssh key it will show up on the SSH keys for VPC list.

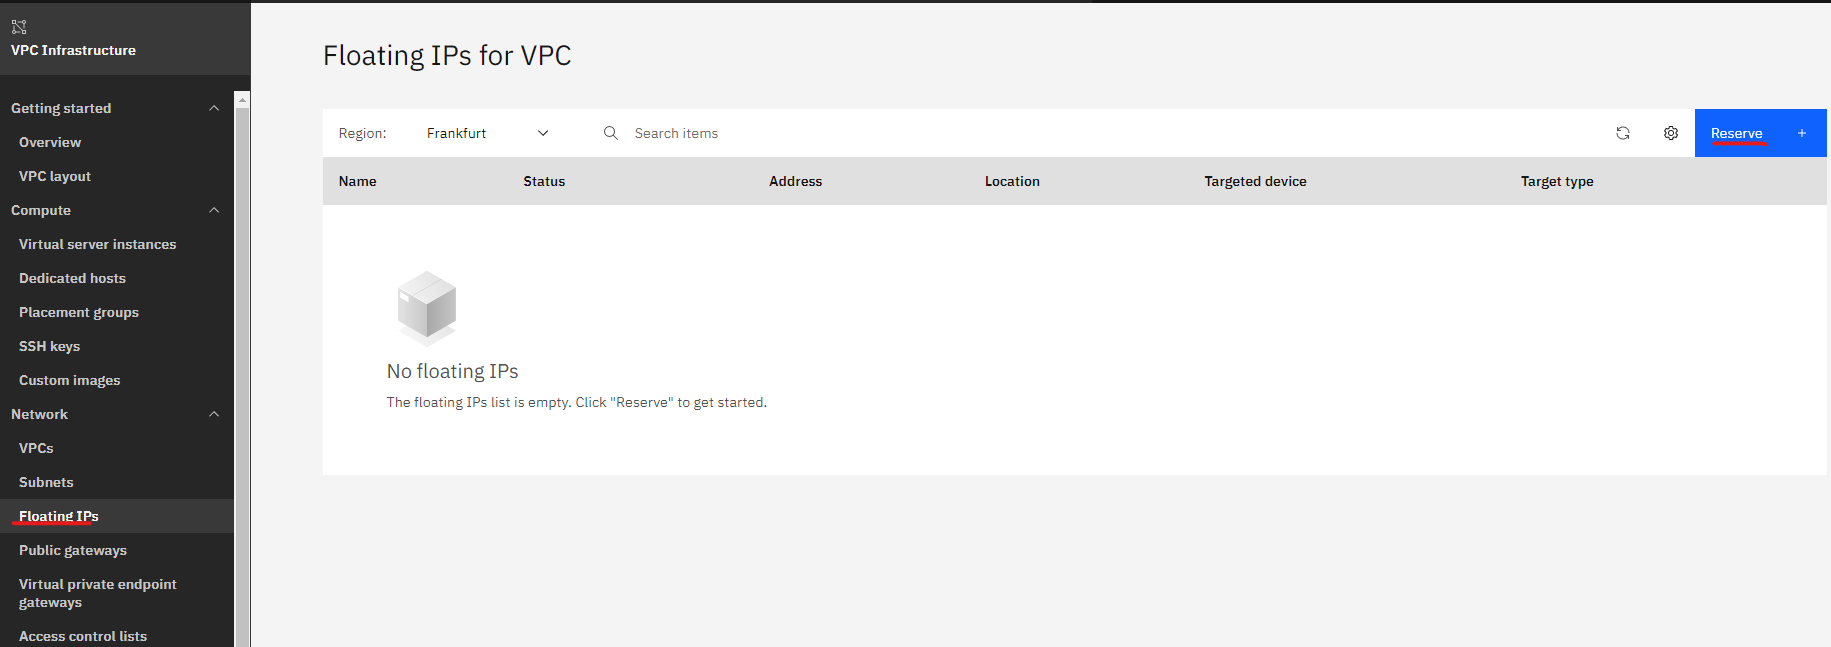
Create Floating IPs for VPC

Floating IPs are basically public ip addresses. To be able to access the server using SSH at the first time a floating ip will be bound to the Virtual server instance for VPC which we will create later on.

Navigate to VPC Infrastructure -> Floating IPs then click Reserve.

Enter the Floating IP name, then click on Reserve. We used testip for the name.

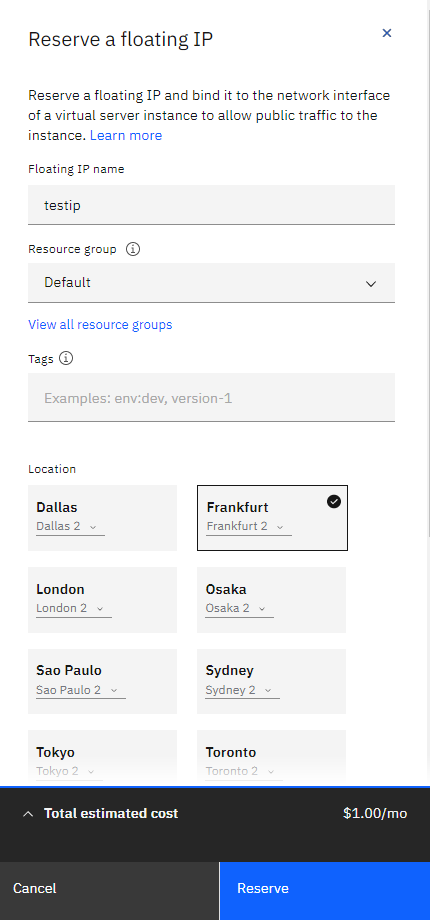
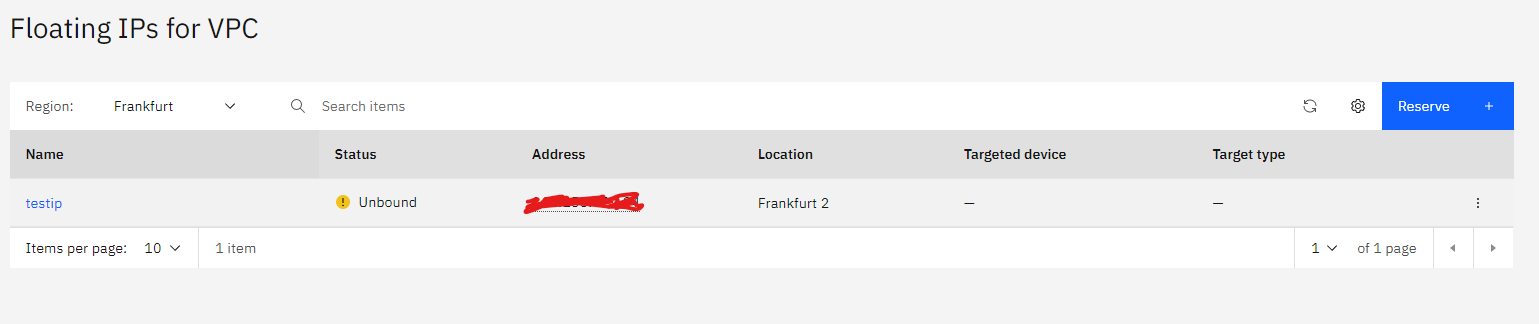
The floating ip is now created.

Create the Virtual server instance for VPC

Now we have the prerequisites in place it is time to create our VM for VPC.

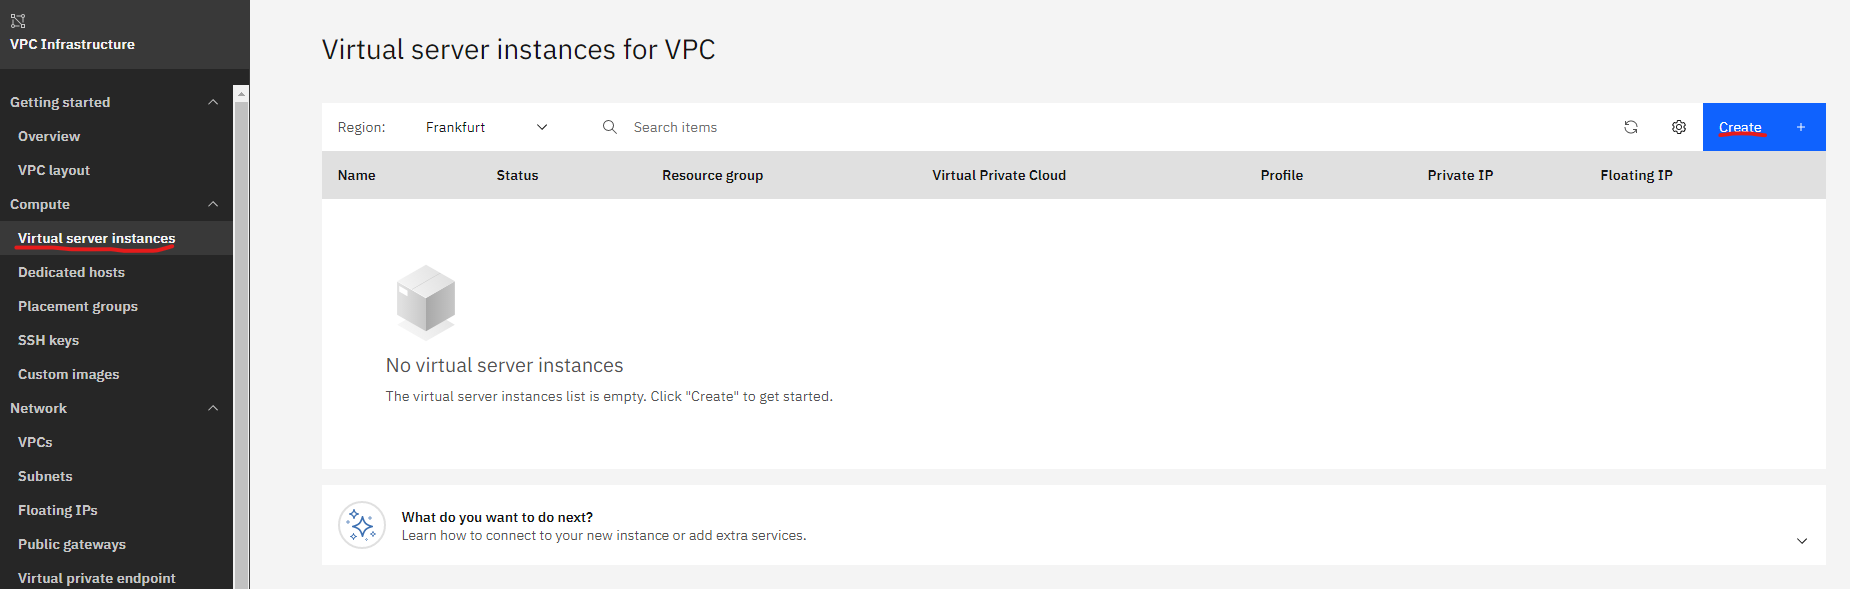
Navigate to VPC Infrastructure -> Virtual server instances and click on Create

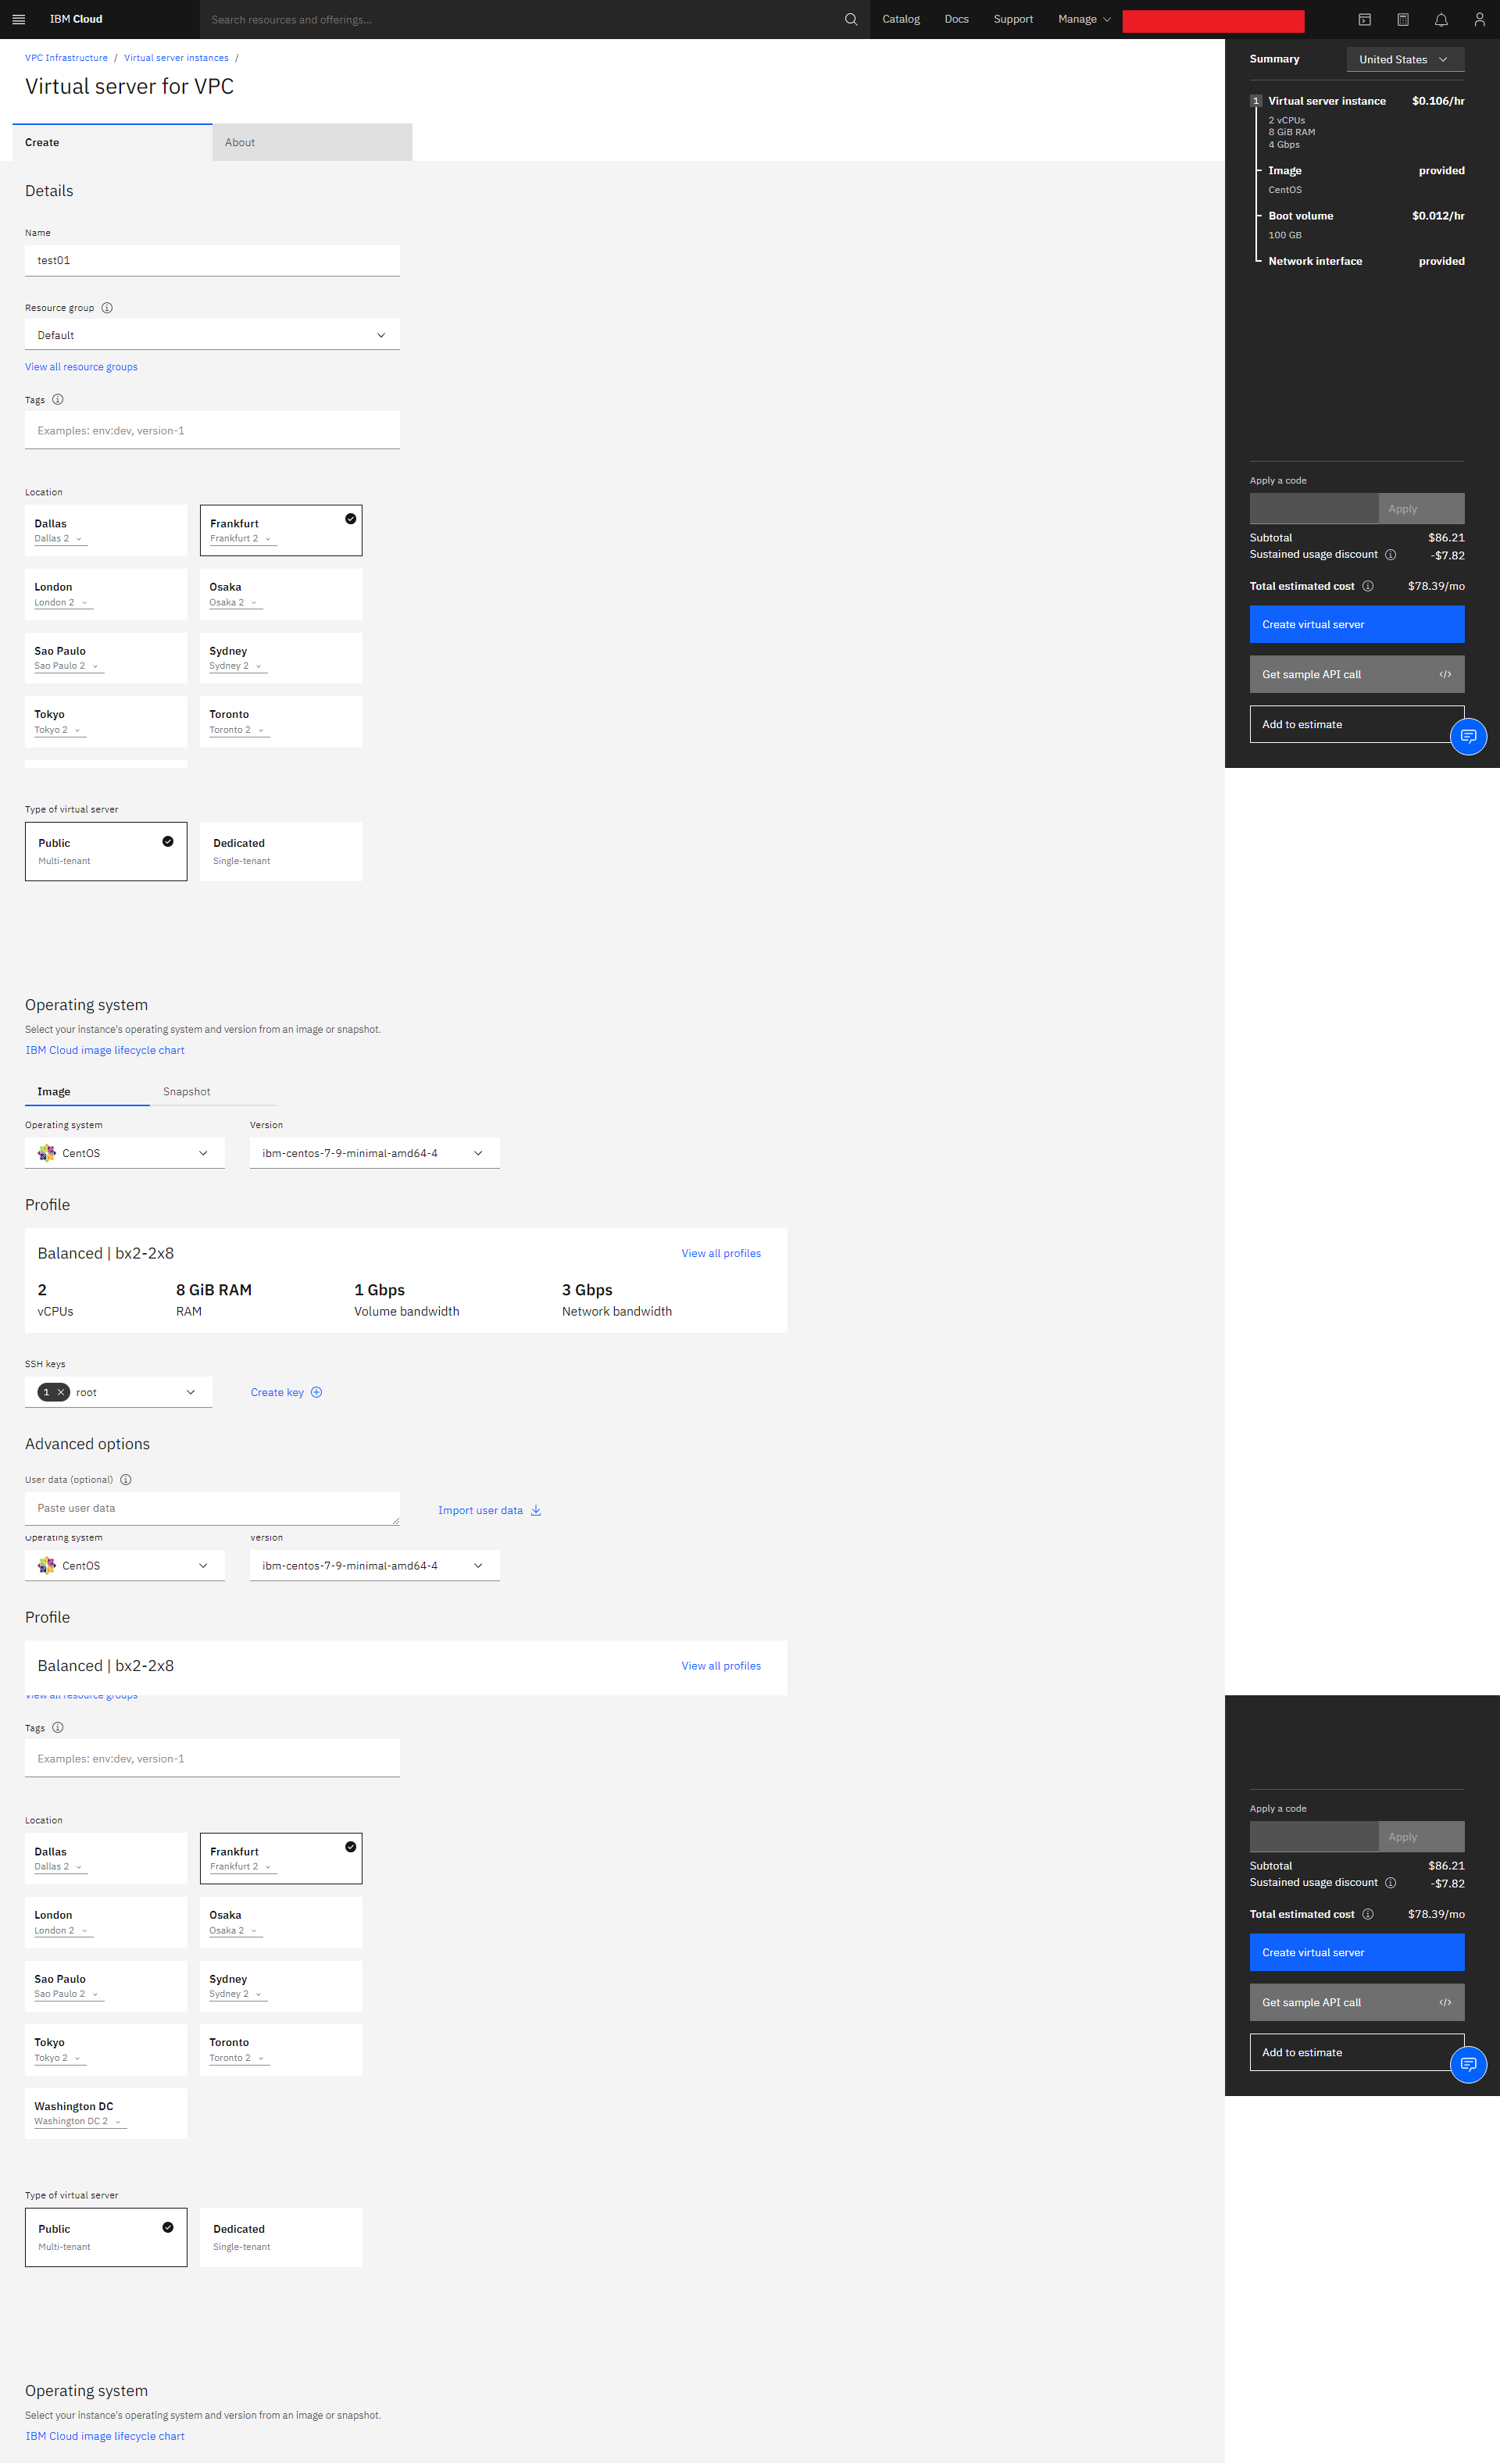
Add the name of you choice and select the ssh keys you have created previously, then click Create virtual Server.

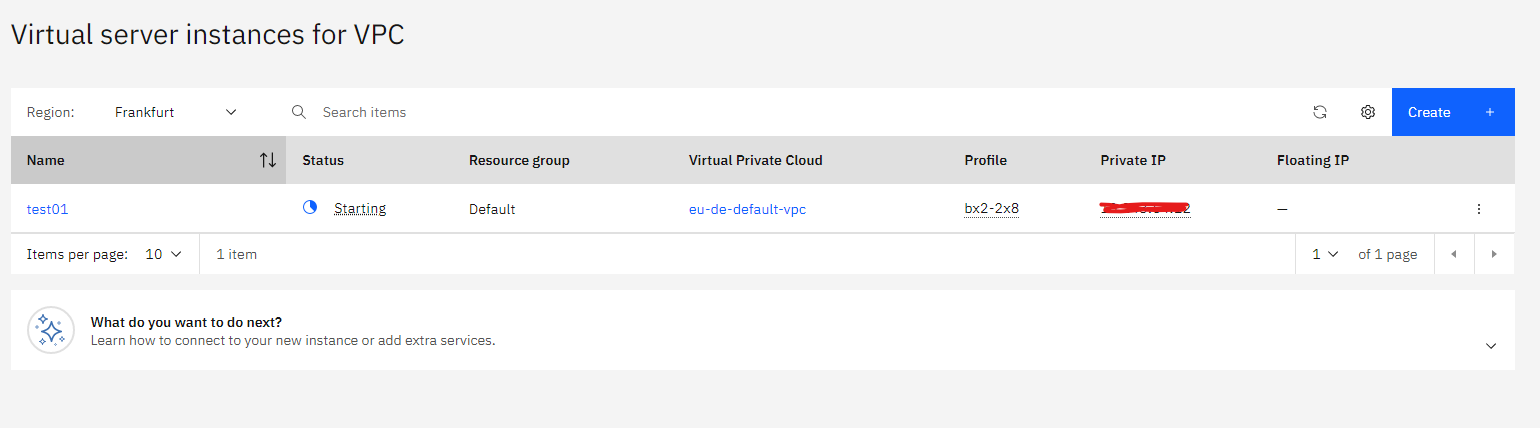
Your virtual server is now created. The vm will only have a Private IP.

Navigate to VPC Infrastructure -> Floating IPs, right click on the drop down menu and select Bind.

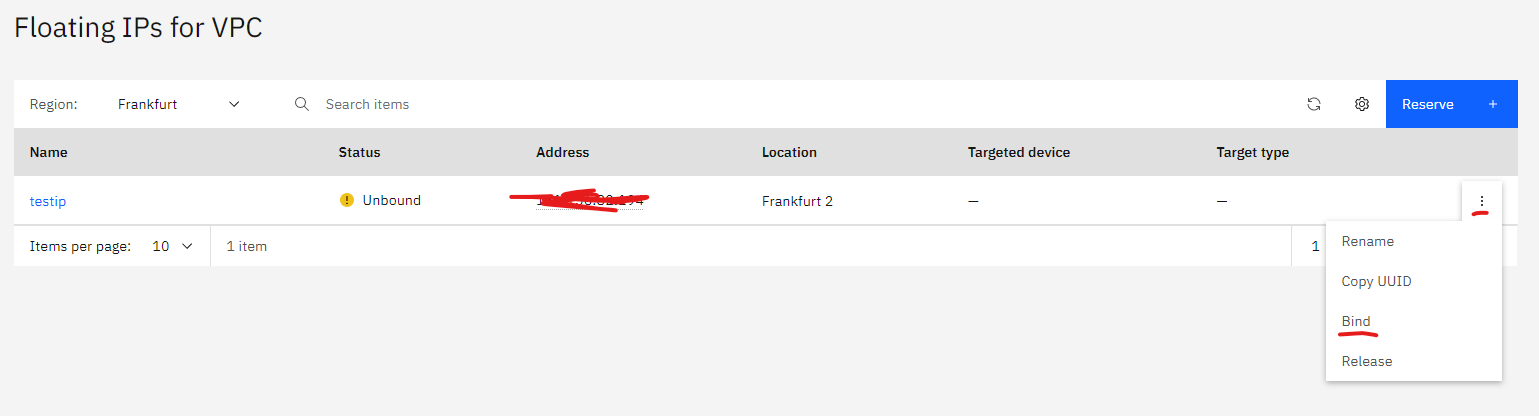
Select the VM instance you have created at Resource to bind then click Bind.

The status is now greened out showing Bound and the Targeted device should show your vm.

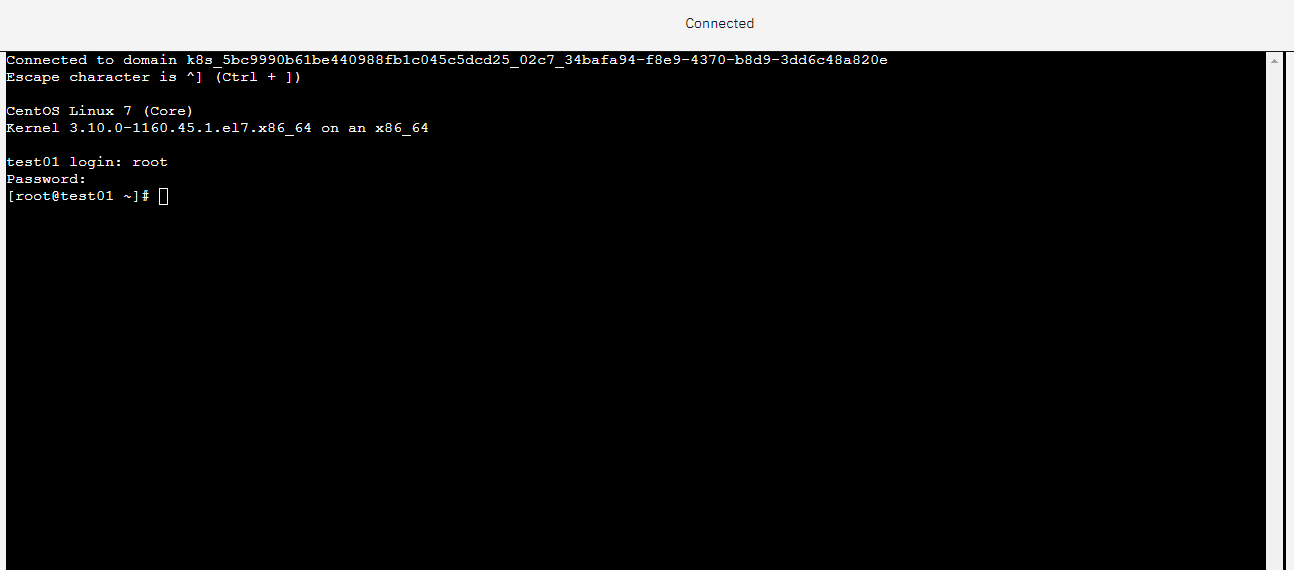
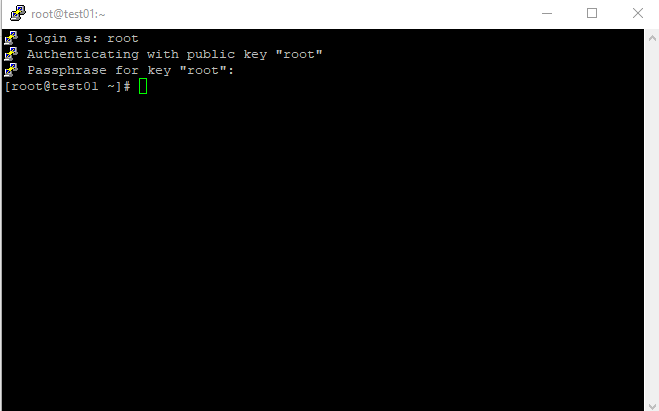
Log into the server using ssh from an other linux server or desktop using the following command:

ssh -i root root@xxx.xxx.xxx.xxx <- Floating ip

after the -i you have to specify the private key filename which is in our case is root.

root@localhost:/app# ssh -i root root@xxx.xxx.xxx.xxx
The authenticity of host ' xxx.xxx.xxx.xxx ( xxx.xxx.xxx.xxx )' can't be established.
ECDSA key fingerprint is SHA256:+wb+ApkNLds5hup2vMWEuvUSoabXppaG1ZCh0FzLrVw.
Are you sure you want to continue connecting (yes/no/[fingerprint])? yes
Warning: Permanently added ' xxx.xxx.xxx.xxx ' (ECDSA) to the list of known hosts.
Enter passphrase for key 'root':
[root@test01 ~]#

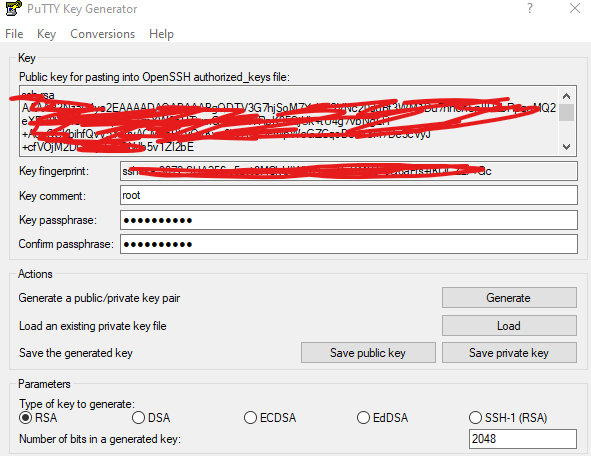
If you would like to use putty to log in from windows then the private key will likely to be incompatible so you will have to use the puttygen utility to load and save the private key in the proper format.

Open the puttygen utility and load your private key. Once loaded click on Save private key and you will get a putty compatible .pkk file.

Open putty, create the session, navigate to the Connection -> SSH -> Auth menu. Click Browse and open the newly generated pkk file then click Open to start the putty session.

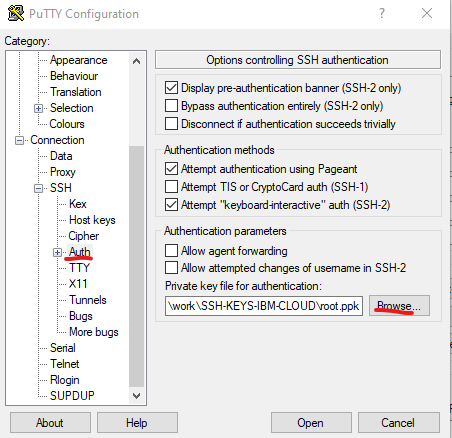
The putty session will now open to the server.

Alternative ways to log in to your server

Once you are logged in you can set the root password using the passwd command and you no longer need to have your server on a public ip address.

Feel free to unbind the Floating IP and use it for a different server or just simply delete it.

Navigate to VPC Infrastructure -> Virtual server instances and click on your VM. once you are in the main screen of your vm, select Actions on the top right corner and pick either Open VNC console or Open serial console.

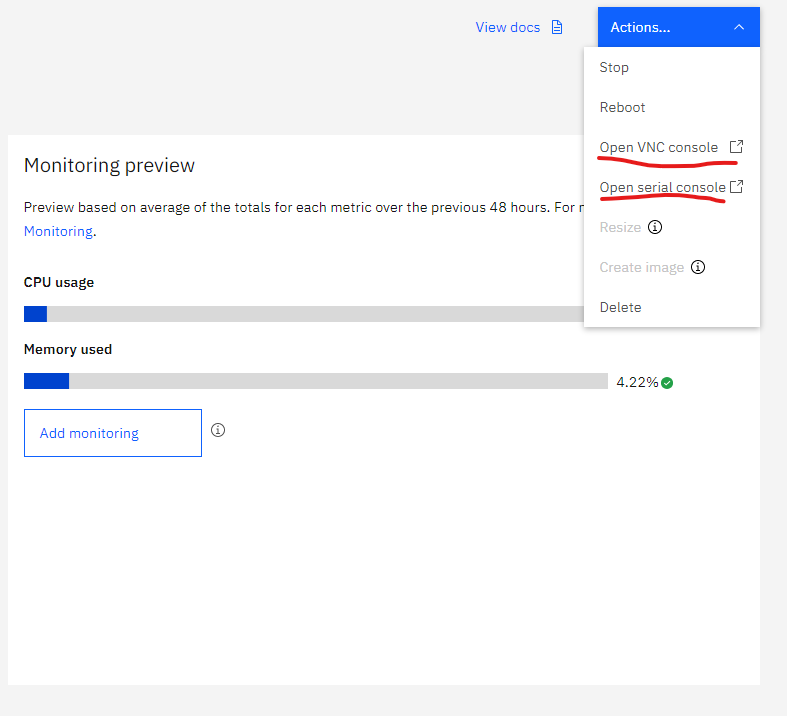
This will open a console to your vm without the need of a public ip address. Use your new password for root to log in.

Use binlog_expire_logs_seconds to purge mysql binary logs automatically

OS: Ubuntu 20

Mysql Version: 8+

We ran into this issue several times that on a high performance mysql server the binary files kept filling up the filesystem. Previously we did the purge manually with the following command from the mysql cli:

PURGE BINARY LOGS BEFORE NOW();

Then we did a bit of research on how to do this automatically and we found the binlog_expire_logs_seconds variable which is located in the /etc/mysql/mysql.conf.d/mysqld.cnf file. So adding the following line…

binlog_expire_logs_seconds = 259200

…will keep only 3 days worth of bin logs. Don’t forget to restart the mysql sevice using…

service mysql restart

…before the changes take effect.

How to find out the Magento 2 store id using the backend

When you manage multiple store instances from Magento 2 sometimes you will need the specific store id of one store, especially if you would like to manipulate data by accessing the database directly.

One might ask why not use the methods provided by Magento2, the answer is simply they are way too slow to manage a store with over 1000 products effectively. Since we have 20K+ products it was necessary to change/manipulate data directly in the database across a huge, enterprise level,multi store environment.

So back to the original topic, the easiest way to find out your store id is

  • Log in to the Magento2 backend
  • Navigate to Stores->(Settings)->Configuration
  • From the store selector menu ( Scope, upper left corner ) select the store you would like to see the store if for
  • Have a look at the very end of the url in your browser and you will see something like: …/section/general/store/6/
  • The number in that URL will tell you what is the store id for the shop you picked from the store selector menu.

mariadb.service: Start operation timed out. Terminating.

We performed housekeeping on our Zabbix instance and by the morning the whole system became unresponsive and even though multiple restarts the database kept hanging. Using the following command: journalctl -u mariadb.service we managed to pull this information.

Feb 05 04:09:07 bezabbix001 mysqld[4042]: 2020-02-05 4:09:07 139744107072640 [Note] /usr/sbin/mysqld (mysqld 10.1.43-MariaDB-0ubuntu0.18.04.1) starting as process 4042 …
Feb 05 04:09:07 bezabbix001 mysqld[4042]: 2020-02-05 4:09:07 139744107072640 [Warning] Could not increase number of max_open_files to more than 16364 (request: 20115)
Feb 05 04:10:37 bezabbix001 systemd[1]: mariadb.service: Start operation timed out. Terminating.
Feb 05 04:12:07 bezabbix001 systemd[1]: mariadb.service: State 'stop-sigterm' timed out. Skipping SIGKILL.
Feb 05 04:13:37 bezabbix001 systemd[1]: mariadb.service: State 'stop-final-sigterm' timed out. Skipping SIGKILL. Entering failed mode.
Feb 05 04:13:37 bezabbix001 systemd[1]: mariadb.service: Failed with result 'timeout'.
Feb 05 04:13:37 bezabbix001 systemd[1]: Failed to start MariaDB 10.1.43 database server.

The first issue indicated insufficient number of open files. The solution to this issue was to increase those numbers by setting the following in the /lib/systemd/system/mariadb.service file.

LimitNOFILE=200000
LimitMEMLOCK=200000

Once we set the setting above and run reload with the following command the Warning message went away.

sudo systemctl daemon-reload

The server however still wasn’t willing to start showing the following in the log:

Feb 05 04:28:19 bezabbix001 mysqld[4932]: 2020-02-05 4:28:19 140431509490816 [Note] /usr/sbin/mysqld (mysqld 10.1.43-MariaDB-0ubuntu0.18.04.1) starting as process 4932 …
Feb 05 04:29:49 bezabbix001 systemd[1]: mariadb.service: Start operation timed out. Terminating.
Feb 05 04:31:19 bezabbix001 systemd[1]: mariadb.service: State 'stop-sigterm' timed out. Skipping SIGKILL.
Feb 05 04:32:49 bezabbix001 systemd[1]: mariadb.service: State 'stop-final-sigterm' timed out. Skipping SIGKILL. Entering failed mode.
Feb 05 04:32:49 bezabbix001 systemd[1]: mariadb.service: Failed with result 'timeout'.
Feb 05 04:32:49 bezabbix001 systemd[1]: Failed to start MariaDB 10.1.43 database server.
Feb 05 04:34:20 bezabbix001 systemd[1]: mariadb.service: Got notification message from PID 4932, but reception only permitted for main PID which is currently not known
Feb 05 04:34:22 bezabbix001 systemd[1]: mariadb.service: Got notification message from PID 4932, but reception only permitted for main PID which is currently not known

This indicated that the service didn’t start within the default 90 seconds however it came up later. Since it has been timed out by service control already once the server came up it was immediately shut down. Looking at the /var/www/mysql/error.log which is the error log for maridb/mysql, we found that the server was just busy processing data and the startup was taking much longer than 90 seconds.

2020-02-05 4:39:55 140524339281024 [Note] InnoDB: Using mutexes to ref count buffer pool pages
2020-02-05 4:39:55 140524339281024 [Note] InnoDB: The InnoDB memory heap is disabled
2020-02-05 4:39:55 140524339281024 [Note] InnoDB: Mutexes and rw_locks use GCC atomic builtins
2020-02-05 4:39:55 140524339281024 [Note] InnoDB: GCC builtin __atomic_thread_fence() is used for memory barrier
2020-02-05 4:39:55 140524339281024 [Note] InnoDB: Compressed tables use zlib 1.2.11
2020-02-05 4:39:55 140524339281024 [Note] InnoDB: Using Linux native AIO
2020-02-05 4:39:55 140524339281024 [Note] InnoDB: Using SSE crc32 instructions
2020-02-05 4:39:55 140524339281024 [Note] InnoDB: Initializing buffer pool, size = 3.0G
2020-02-05 4:39:55 140524339281024 [Note] InnoDB: Completed initialization of buffer pool
2020-02-05 4:39:55 140524339281024 [Note] InnoDB: Highest supported file format is Barracuda.
InnoDB: 1 transaction(s) which must be rolled back or cleaned up
InnoDB: in total 86545366 row operations to undo
InnoDB: Trx id counter is 311544320
2020-02-05 4:54:54 140524339281024 [Note] InnoDB: 128 rollback segment(s) are active.
2020-02-05 4:54:54 140520315680512 [Note] InnoDB: Starting in background the rollback of recovered transactions
2020-02-05 4:54:54 140520315680512 [Note] InnoDB: To roll back: 1 transactions, 86545366 rows
2020-02-05 4:54:54 140524339281024 [Note] InnoDB: Percona XtraDB (http://www.percona.com) 5.6.45-86.1 started; log sequence number 376642022837
2020-02-05 4:54:54 140520315680512 [Warning] InnoDB: Difficult to find free blocks in the buffer pool (21 search iterations)! 0 failed attempts to flush a page!
2020-02-05 4:54:54 140520315680512 [Note] InnoDB: Consider increasing the buffer pool size.
2020-02-05 4:54:54 140520315680512 [Note] InnoDB: Pending flushes (fsync) log: 0 buffer pool: 1 OS file reads: 341095 OS file writes: 3 OS fsyncs: 2
2020-02-05 4:54:55 140520240146176 [Note] InnoDB: Dumping buffer pool(s) not yet started
2020-02-05 4:54:55 140524339281024 [Note] Plugin 'FEEDBACK' is disabled.
2020-02-05 4:54:55 140524339281024 [Note] Server socket created on IP: '0.0.0.0'.
2020-02-05 4:54:55 140524338853632 [Note] /usr/sbin/mysqld: Normal shutdown
2020-02-05 4:54:56 140524339281024 [Note] /usr/sbin/mysqld: ready for connections.
Version: '10.1.43-MariaDB-0ubuntu0.18.04.1' socket: '/var/run/mysqld/mysqld.sock' port: 3306 Ubuntu 18.04
2020-02-05 4:54:56 140524338853632 [Note] Event Scheduler: Purging the queue. 0 events
2020-02-05 4:54:56 140520273716992 [Note] InnoDB: FTS optimize thread exiting.
2020-02-05 4:54:56 140524338853632 [Note] InnoDB: Starting shutdown…
2020-02-05 4:54:56 140524338853632 [Note] InnoDB: Waiting for page_cleaner to finish flushing of buffer pool
2020-02-05 4:54:58 140524338853632 [Note] InnoDB: Shutdown completed; log sequence number 376642023203
2020-02-05 4:54:58 140524338853632 [Note] /usr/sbin/mysqld: Shutdown complete

The following settings were added to the /lib/systemd/system/mariadb.service file to increase service start and stop timeout.

TimeoutStartSec=infinity
TimeoutStopSec=infinity

Run reload to apply these settings:

sudo systemctl daemon-reload

The mariadb server slowly but finally started after increasing the timeout.

2020-02-05 5:12:06 139656180632704 [Note] InnoDB: Using mutexes to ref count buffer pool pages
2020-02-05 5:12:06 139656180632704 [Note] InnoDB: The InnoDB memory heap is disabled
2020-02-05 5:12:06 139656180632704 [Note] InnoDB: Mutexes and rw_locks use GCC atomic builtins
2020-02-05 5:12:06 139656180632704 [Note] InnoDB: GCC builtin __atomic_thread_fence() is used for memory barrier
2020-02-05 5:12:06 139656180632704 [Note] InnoDB: Compressed tables use zlib 1.2.11
2020-02-05 5:12:06 139656180632704 [Note] InnoDB: Using Linux native AIO
2020-02-05 5:12:06 139656180632704 [Note] InnoDB: Using SSE crc32 instructions
2020-02-05 5:12:06 139656180632704 [Note] InnoDB: Initializing buffer pool, size = 5.0G
2020-02-05 5:12:06 139656180632704 [Note] InnoDB: Completed initialization of buffer pool
2020-02-05 5:12:06 139656180632704 [Note] InnoDB: Highest supported file format is Barracuda.
InnoDB: 1 transaction(s) which must be rolled back or cleaned up
InnoDB: in total 86545366 row operations to undo
InnoDB: Trx id counter is 311544832
2020-02-05 5:25:38 139656180632704 [Note] InnoDB: 128 rollback segment(s) are active.
2020-02-05 5:25:38 139649825634048 [Note] InnoDB: Starting in background the rollback of recovered transactions
2020-02-05 5:25:38 139649825634048 [Note] InnoDB: To roll back: 1 transactions, 86545366 rows
2020-02-05 5:25:38 139656180632704 [Note] InnoDB: Waiting for purge to start
2020-02-05 5:25:38 139656180632704 [Note] InnoDB: Percona XtraDB (http://www.percona.com) 5.6.45-86.1 started; log sequence number 376642023203
2020-02-05 5:25:38 139649825634048 [Warning] InnoDB: Difficult to find free blocks in the buffer pool (21 search iterations)! 0 failed attempts to flush a page!
2020-02-05 5:25:38 139649825634048 [Note] InnoDB: Consider increasing the buffer pool size.
2020-02-05 5:25:38 139649825634048 [Note] InnoDB: Pending flushes (fsync) log: 1 buffer pool: 0 OS file reads: 341115 OS file writes: 5 OS fsyncs: 4
2020-02-05 5:25:39 139649750099712 [Note] InnoDB: Dumping buffer pool(s) not yet started
2020-02-05 5:25:39 139656180632704 [Note] Plugin 'FEEDBACK' is disabled.
2020-02-05 5:25:39 139656180632704 [Note] Server socket created on IP: '0.0.0.0'.
2020-02-05 5:25:40 139656180632704 [Note] /usr/sbin/mysqld: ready for connections.
Version: '10.1.43-MariaDB-0ubuntu0.18.04.1' socket: '/var/run/mysqld/mysqld.sock' port: 3306 Ubuntu 18.04
2020-02-05 5:25:53 139649825634048 [Note] InnoDB: To roll back: 1 transactions, 86544705 rows
2020-02-05 5:26:08 139649825634048 [Note] InnoDB: To roll back: 1 transactions, 86543690 rows
2020-02-05 5:26:23 139649825634048 [Note] InnoDB: To roll back: 1 transactions, 86464992 rows
2020-02-05 5:26:38 139649825634048 [Note] InnoDB: To roll back: 1 transactions, 85968784 rows
2020-02-05 5:26:53 139649825634048 [Note] InnoDB: To roll back: 1 transactions, 85674936 rows
2020-02-05 5:27:08 139649825634048 [Note] InnoDB: To roll back: 1 transactions, 85274020 rows

Installing the IBM Tivoli Integration Composer

This article will help you install the IBM Tivoli Integration Composer. As usual we will use SLES 11 SP3 as an installation OS. We used 6 gigabyte of RAM, 2 CPU cores and 50 gigabytes of disk space in this scenario.

Start the installation from /Install/ITIC/setup.bin command from the IBM Control Desk root installation directory. You need to have java installed in order to be able to start the installation process. We recommend to use the java that is supplied with Control Desk and it is located in /app/IBM/SMP/sdk/ directory in our environment.

HUCTRLDSK001-P1:/Downloads/TIVOLI-IMAGES/CONTROLDESK753/Install/ITIC # ./setup.bin
Preparing to install…
Extracting the installation resources from the installer archive…
Configuring the installer for this system’s environment…

Launching installer…

Select your desired installation language then click OK.

ibm-tivoli-integration-composer-select-install-languageClick Next at the installation Welcome screen then select New Install at the next screen, then click Install.

ibm-tivoli-integration-composer-new-installThe installer will detect the java version and location on the box.

ibm-tivoli-integration-composer-java-locationWe changed the installation folder to go under /app/IBM. Specify the directory you want to product to be installed then click Next.

ibm-tivoli-integration-composer-install-locationjSelect DB2 as the database type for this installation, then click Next.

ibm-tivoli-integration-composer-db2Specify the hostname and the DB2 connection parameters, then click Next.

ibm-tivoli-integration-composer-db2-detailsSelect Disable software updates then click Next.

ibm-tivoli-integration-composer-disable-software-instancesSpecify the location of your web browser or just leave it default if the installer detects it correctly. Click Next to continue the installation process.

ibm-tivoli-integration-composer-browser-settingReview the pre-installation summary then click Install to kick off the product installation.

ibm-tivoli-integration-composer-pre-installation-summaryIf the installation was successful you should see the following window.

ibm-tivoli-integration-composer-installation-doneEdit the init.sh file located in ./bin directory of your Integration Composer directory. Change the JAVA_HOME variable ( it if is not already done ) to the java directory that is supplied with Control Desk.

# ===============
# SPECIFY THE JDK
# ===============
JAVA_HOME=/app/IBM/SMP/sdk/

Please note that Integration Composer is very sensitive on the java versions. If you have Oracle java or a different version if might not work with it properly.

Windows 7 Install – Cannot Find DVD Driver Solution

I bought new hardware a week ago and I decided to try windows 7 64bit. After putting it all together I tried to install Windows 7 which was going for a while then it started to complain about the DVD Driver and the installation process stopped. This error usually happens when you have an old DVD drive which is no longer supported by Windows 7 64bit. Well I have a 5 year old Benq DW1620 DVD drive. After browsing the forums and finding no useful information on this apart from buying a Windows 7 compatible DVD Driver I decided to try a different approach: Installing Windows 7 from a USB key.

This magically solved the installation problem and the DVD drive is now working properly under Windows 7 without any additional tweaking.

To install Windows 7 from a USB key follow this guide

Please watch out for the following things while using this guide:

  • If you use XP the diskpart utility will NOT show your USB keys. So instead of doing it from diskpart you can complete the relevant steps from the Disk Manager. The easiest to start the Disk Manager: Click Start > Run and type diskmgmt.msc in the Open line and click OK. The Disk Management snap-in will open.
  • If you do not have the relevant bootsect.exe ( 32 bit version for 32 bit Windows 7 and 64bit version for 64bit operating system ) you will not be able to create the bootdisk. To fix this download the relevant version of bootsect.exe.

Preparing a joomla test environment on Ubuntu for existing Joomla site

You will need to install following to prepare a test environment on Ubuntu for Joomla:

Install Apache Web Server:
sudo apt-get install apache2

Install PHP5:
sudo apt-get install php5

Install PHP Apache libraries:
sudo apt-get install libapache2-mod-php5

Restart Webserver:
sudo /etc/init.d/apache2 restart

Instal MySQL Server:
sudo apt-get install mysql-server

Install PHP Module for MySQL5:
sudo apt-get install php5-mysql

Installing phpMyAdmin:

Download latest package from

  • http://www.phpmyadmin.net/
  • Create a directory phpmyadmin in your web server root ( usually it is /var/www )

    Create the config directory in /var/www/phpmyadmin/

    Change permissions on config:
    sudo chmod 777 /var/www/phpmyadmin/config

    Open the following page in a browser http://localhost/phpmyadmin/setup/install.php

    Add your server configration and save the config file

    Install Mcrypt:
    sudo apt-get install php5-mcrypt

    Restart apache server:
    sudo /etc/init.d/apache2 restart

    Open the following page in a browser http://localhost/phpmyadmin/index.php

    Remove config directory from /var/www/phpmyadmin/

    Install MySQL Admin:
    sudo apt-get install mysql-admin

    Create and Download latest cpanel backup from your host.

    Create a directory in /var/www/ which will contain your website.
    copy the joomla files from the backup file to the directory what you have created remember you should copy your site’s document root
    Open configuration.php and modify the following values:

    $mosConfig_absolute_path = ‘/var/www/[directory what you have created]’;
    $mosConfig_cachepath = ‘/var/www/[directory what you have created]/cache’;
    $mosConfig_live_site = ‘http://localhost/[directory what you have created]’;

    Note the value of these 3 variables:

    $mosConfig_db <- This will be the MySQL database associated with your website. $mosConfig_user <- This will the MySQL user. $mosConfig_password <- This will be the password for your MySQL user. Now it is time to create the MySQL database from the backup. Look for the database SQL file in the backup. The filename should be the same as the database name so it would be something like [database name].sql.

    Now start the MySQL admin graphical interface: ./mysql-admin
    After logging in click on Restore Backup the click on Change Path to select the path to your MySQL backup file

    Select the mysql backup file, select the relevant encoding and create a New Schema for your database. This should be the same as your database name.
    Click on Restore Backup

    Once the backup is restored create the database user id and password, and grant all rights to the database for this user.