In certain customer environments only windows based servers are allowed on the network. Previously this was a showstopper for zabbix proxy and server implementations. Fortunately with the new windows architectures there is a way to install Zabbix Server or Zabbix Proxy on windows.
In this walkthrough we will install the Zabbix proxy on windows server 2019. Windows Server 2019 and Windows 10 comes with the WSL option which stands for Windows Subsystem for Linux.
Windows Subsystem for Linux (WSL) is a new Windows 10/Windows Server 2019 feature that enables you to run native Linux command-line tools directly on Windows, alongside your traditional Windows desktop and modern store apps.
There are multiple options available for Linux distributions in WSL. We will however pick ubuntu server 18.4 for our demonstration.
First we will need to enable the WLS option on Windows Server 2019 by executing the following command in powershell. Don’t forget to open powershell as administrator.
Install the ubuntu instance by executing ubuntu1804.exe from c:\ubuntu. As part of the installation we defined our first ubuntu user as seen below. Once the session is open you can start using your ubuntu instance right away. The ubuntu session will look like a powershell window which is pretty cool. It will be using the same hostname, memory, disks, etc as the windows host. You basically have access to every resource the windows OS has but you are still running a full featured ubuntu server.
PS C:\ubuntu> .\ubuntu1804.exe
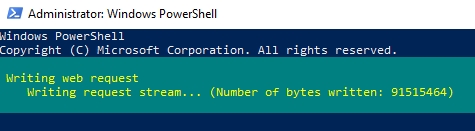
Installing, this may take a few minutes…
Please create a default UNIX user account. The username does not need to match your Windows username.
For more information visit: https://aka.ms/wslusers
Enter new UNIX username: user
Enter new UNIX password:
Retype new UNIX password:
passwd: password updated successfully
Installation successful!
To run a command as administrator (user "root"), use "sudo ".
See "man sudo_root" for details.
user@WIN-72UH30KQAK4:~$ sudo su - [sudo] password for user:
root@WIN-72UH30KQAK4:~#
We defined the zabbix repo that matches our distribution. We install zabbix 4.0 LTS in this example.
After the ubuntu system is on the latest software level we install the zabbix proxy. We used the MySQL based zabbix proxy installation which will install mariadb as part of the proxy installation.
apt install zabbix-proxy-mysql
Once the proxy is installed we create the zabbix database and user with the following commands.
mysql -u root
create database zabbix character set utf8 collate utf8_bin;
grant all privileges on zabbix.* to 'zabbix'@'localhost' identified by 'yourpassword';
quit;
We now create the database schemas for the Zabbix Proxy.
zcat /usr/share/doc/zabbix-proxy-mysql/schema.sql.gz | mysql -uzabbix -p [yourpassword]
The next step is to edit the /etc/zabbix/zabbix_proxy.conf file with your parameters. We use an encrypted active connection between the zabbix proxy and the zabbix server. Hence we also use certificates in the configuration file.
We added the database connection settings to the configuration file:
We are not going to go into detail on how to set up the rest of the proxy configuration file. Please follow the official instructions to set up your own configuration parameters in the configuration file.
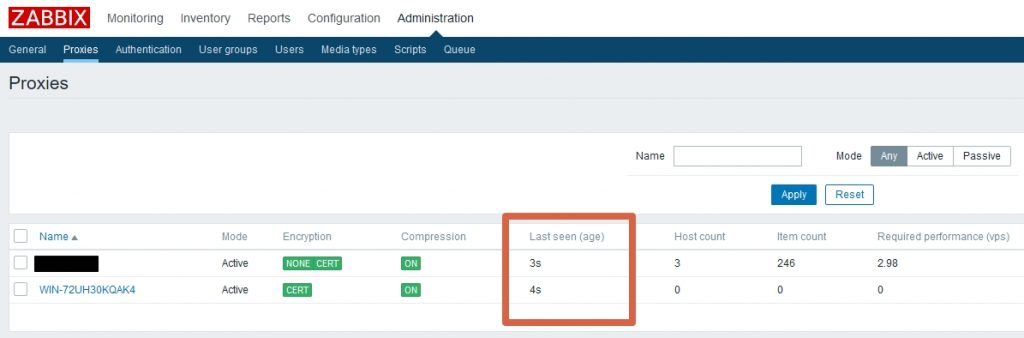
Before we can start the zabbix proxy we need to create the proxy on the zabbix console. Open your zabbix frontend and go to Administration->Proxies and click “Create proxy” on the upper right corner.
We filled in the hostname of the zabbix proxy and picked the relevant Encryption level checkbox. We used “Cerfiticate”.
If all goes well you will see your new proxy connected like this on the zabbix console.
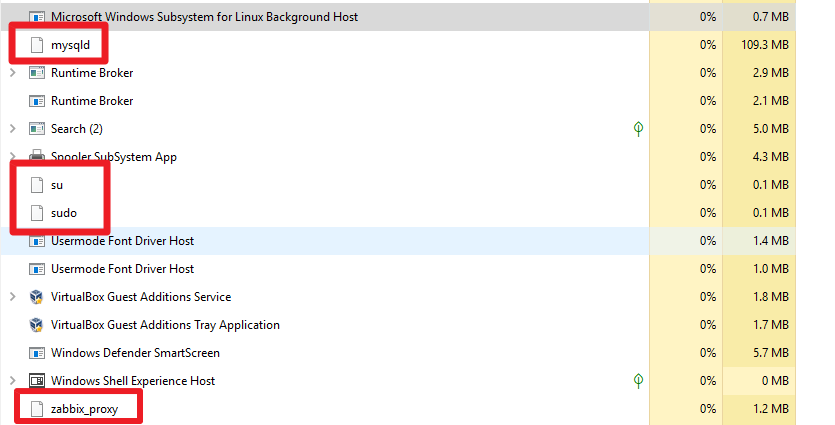
the resource usage of the mysqld, zabbix-proxy and ubuntu processes show up in the windows task manager like a normal windows process.
Whenever we need to interact with the ubuntu server we can open a session using the following icon on taskbar. The server keeps running regardless these sessions are open or closed.
If you have windows firewall enabled on your server, make sure that your proxy port is open across so agents can connect to it.
The next and last step we had to do is to make sure that the mysql and zabbix-proxy service starts when the windows server is rebooted. By default ubuntu init.d services are not respected so we had to do the following:
Add the following lines to the /etc/sudoers file on ubuntu:
Sometimes Magento 2 is stuck in a failed install and backups won’t work. In my case the failure was that the system couldn’t unset maintenance mode, which is not really an error. If you run into something similar just remove
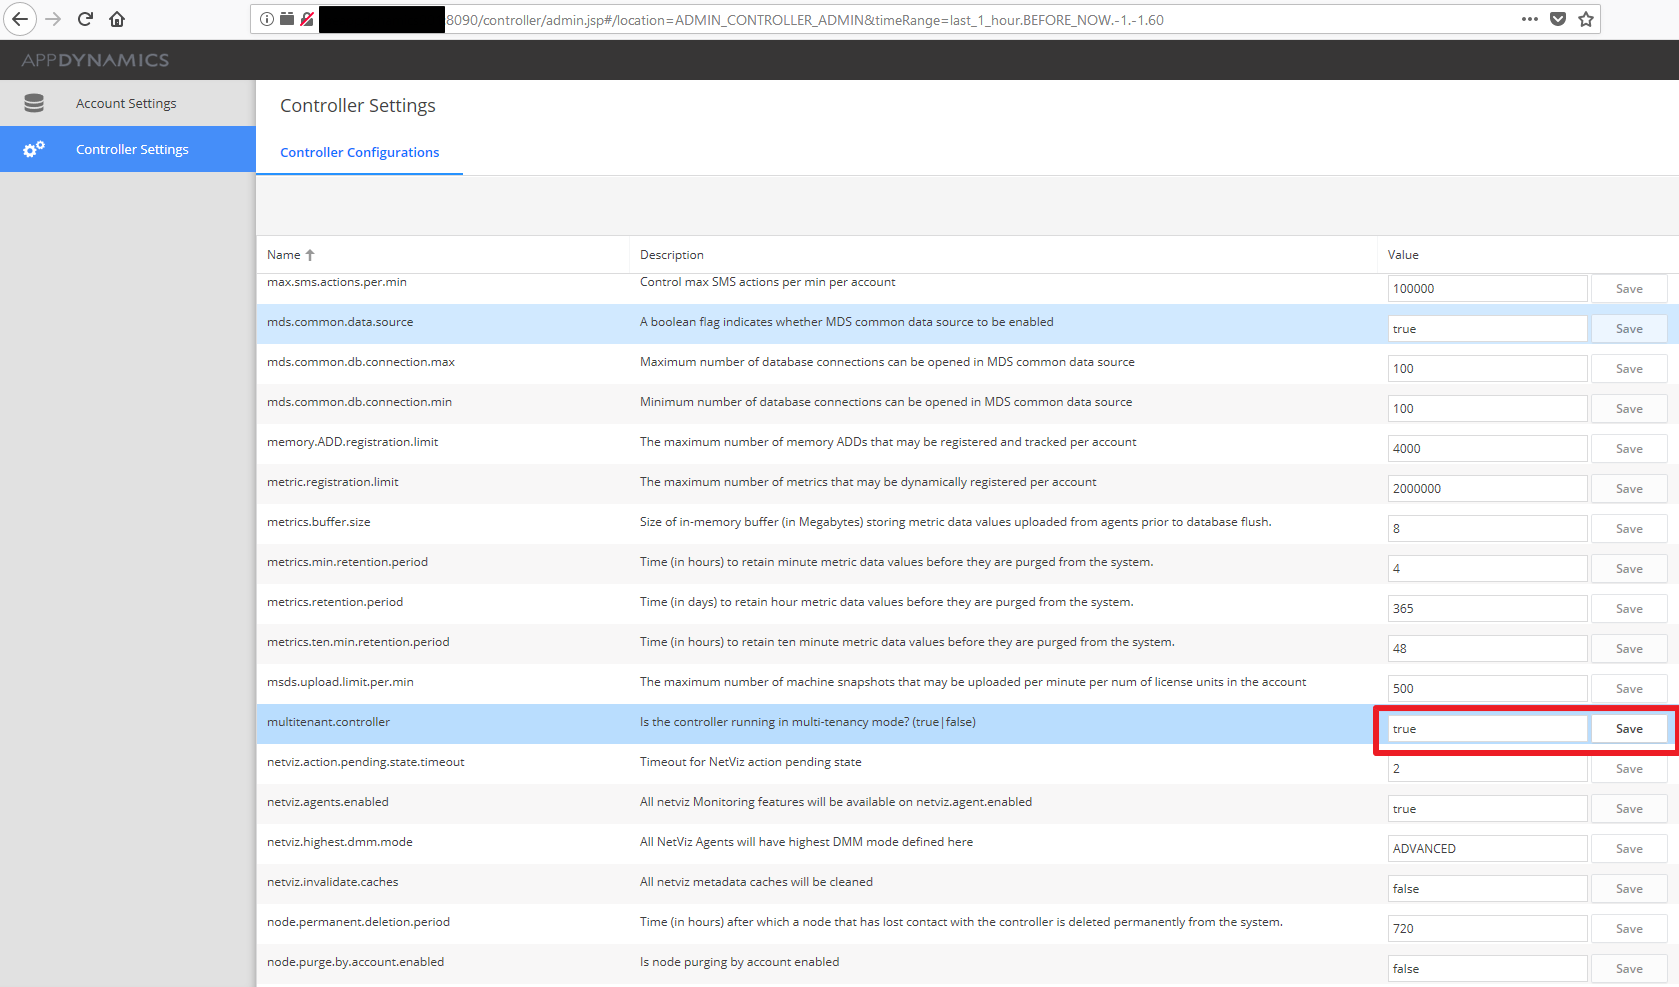
Setting up multitenancy in Appdynamics is relatively easy. This is basically a setting at the controller’s admin console not to be confused with the standard console. You can access your controller admin console at http://hostname:8090/controller/admin.jsp
Once you are logged into the controller’s admin backend click on Controller Settings, then locate multitenant.controller setting and set it to true. Please note that once you set your controller to multitenant mode it can not be switched back anymore.
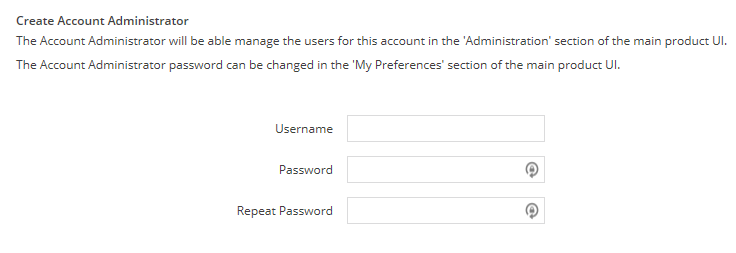
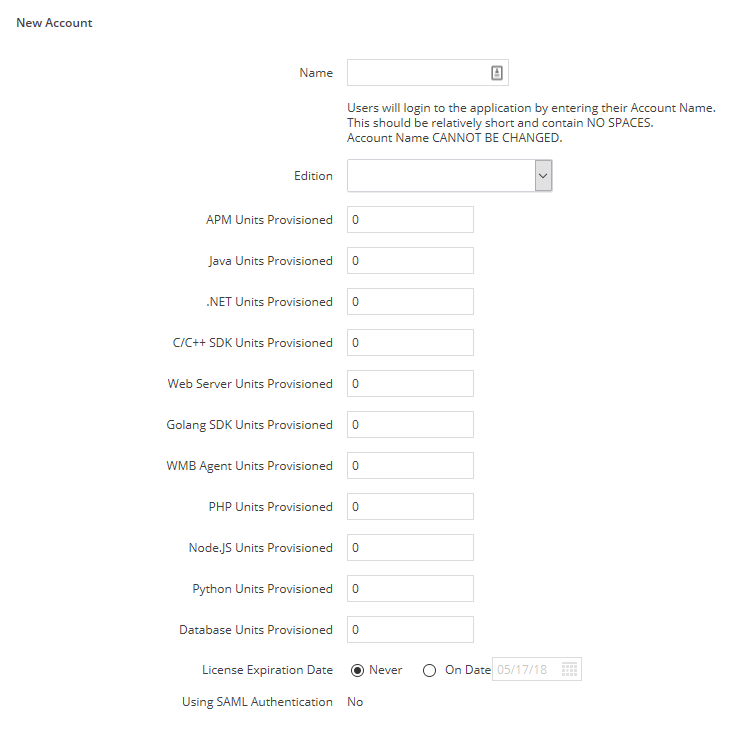
Click Account Settings to and click Add set up a new customer account. You have to specify the account admin user, its password.
Also specify the number of licenses you want to use for this account and the account’s name.
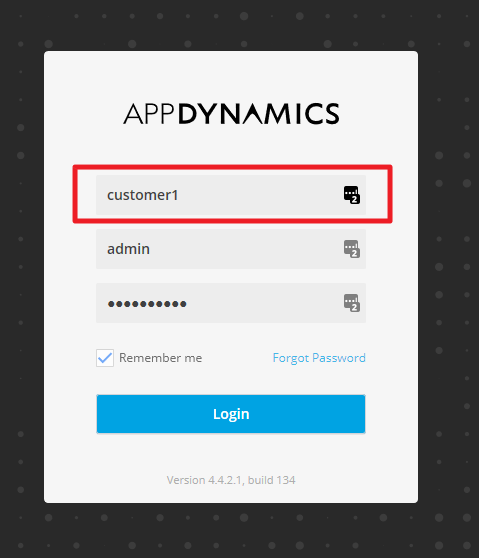
Once the account is set up you can log off this console and try logging in to your Appdynamics admin panel by visiting https://hostname:8090.
You should see a new field on the login screen asking for the account name you would like use along with the user id and password. Specify your recently created account name, the account admin user and its password to log in.
You should see an empty console when you log in just like this one below.
If you would like to add agents to this newly created account you will have to use the new account name and its account access key ( can be found at the account setup in the controller admin console ) at installation time or just simply change these settings in the controller-info.xml if you already have agents on those servers. Using separate account name and account access key for each customer is how Appdynamics separates one account from an other.
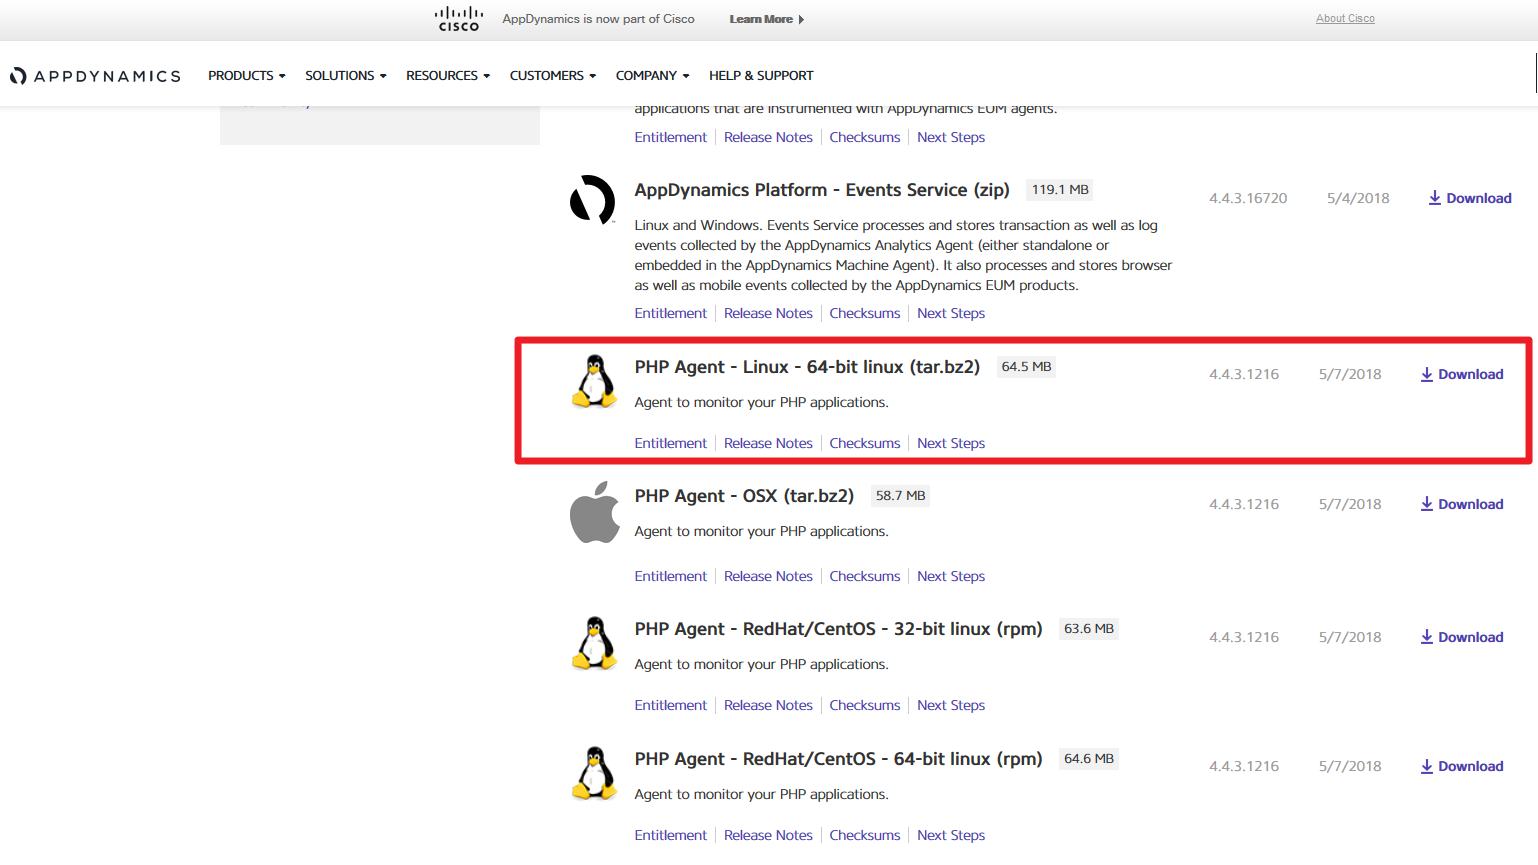
The first step is to install the Appdynamics PHP Agent which will monitor the internals of PHP on this Ubuntu Server. We have downloaded the agent from https://downloads.appdynamics.com.
This agent has no pre-defined configuration file included so we need to do the installation and configuration manually. Upload the agent and unpack it into a desired location.
root@HUAPPD001-P1:/app/appdynamics/phpagent# bzip2 -d appdynamics-php-agent-x64-linux-4.4.3.1216.tar.bz2
root@HUAPPD001-P1:/app/appdynamics/phpagent# tar xvf appdynamics-php-agent-x64-linux-4.4.3.1216.tar
root@HUAPPD001-P1:/app/appdynamics/phpagent/appdynamics-php-agent-linux_x64# mv * /app/appdynamics/phpagent/
root@HUAPPD001-P1:/app/appdynamics/phpagent/appdynamics-php-agent-linux_x64# cd ..
root@HUAPPD001-P1:/app/appdynamics/phpagent# rm -rf appdynamics-php-agent-linux_x64
root@HUAPPD001-P1:/app/appdynamics/phpagent# ls -ltr
total 64
-rw-r--r-- 1 root root 2343 máj 5 02:50 Install.txt
drwxrwxr-x 9 root root 4096 máj 5 03:00 proxy
-rw-r--r-- 1 root root 5062 máj 5 03:00 phpcheck.sh
drwxrwxr-x 4 root root 4096 máj 5 03:00 php
drwxrwxrwx 2 root root 4096 máj 5 03:00 logs
-rw-rw-r-- 1 root root 35 máj 5 03:00 LICENSE.txt
-rwxrwxr-x 1 root root 30113 máj 5 03:00 install.sh
-rw-r--r-- 1 root root 305 máj 5 03:00 appdynamics_api_header.php
To install the application we will have to call the install.sh command. This command will perform the following:
Copy appdynamics_agent.so to the php extension library. This extension is called automatically anytime a php page is invoked.
Copy the appdynamics_agent.ini to the same directory where the php.ini resides
Configure the controller-info.xml file.
Creates the runProxy executable to start the agent.
The following parameters are mandatory – in this order – for the install.sh:
-a account-name@account-access-key which is your unique name and key assigned to you by appdynamics.
controller’s hostname ( make sure host is resolvable and you can connect to the controller’s connection port.
controller’s port
Application’s name ( Appdynamics application you want the agent to report to )
Application tier ( The tier inside the application, it doesn’t have to be pre-created )
Application node ( The node belonging to the tier, it doesn’t have to be pre-created )
As you can see above the installer found most of the settings automatically and installed the agent. In our case the location of the php.ini was incorrect so we manually locate the php.ini files by executing:
We found 2 php.ini‘s on our system, one of them is responsible for the settings for the client run php scripts and the other one is responsible for the apache webserver run php processes. We want to monitor wordpress and mysql so we need to modify the apache one.
Open /etc/php/7.0/cli/conf.d/appdynamics_agent.ini
Copy all the settings in appdynamics_agent.ini to the end of the php.ini located in /etc/php/7.0/apache2/
Restart the apache2 server: service apache2 restart
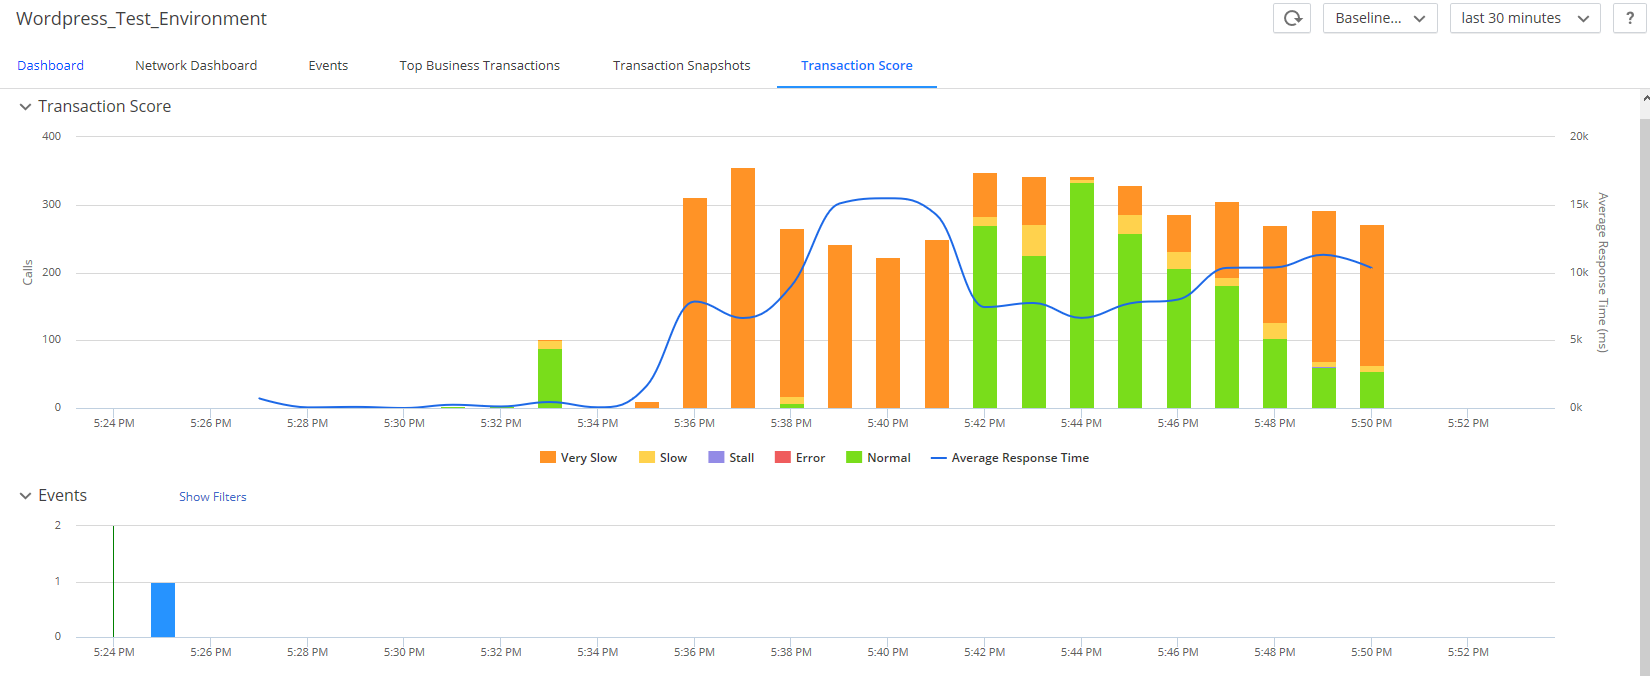
Now we need to generate some traffic for the appdynamics controller. We have created a load plan with the Paessler Web Server Stress Tool and started loading the website heavily.
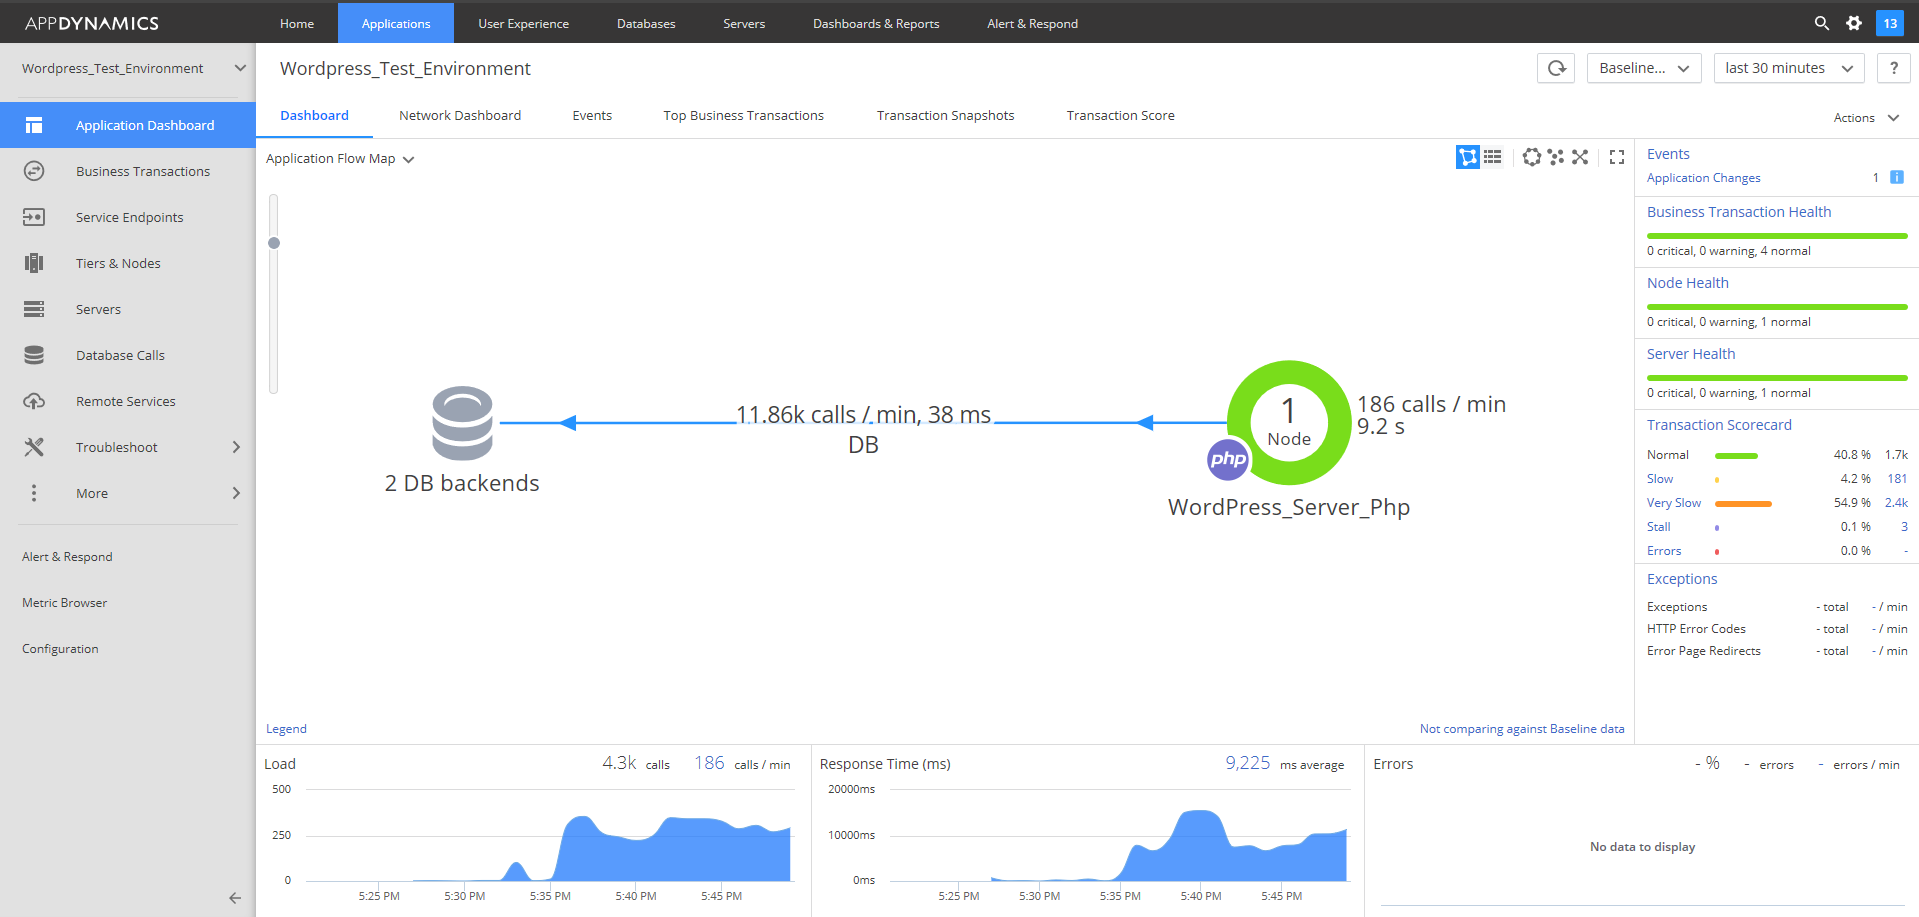
In a few minutes data starts flowing into the appdynamics application dashboard.
Transactions also show up in the other views.
Database calls are automatically detected and queries are displayed.
Downloading and installing the Appdynamics Machine Agent
We have recently set up a test environment with a PHP/MySQL based test Ubuntu 16.04.4 server. We will now set up monitoring for Linux OS, PHP 7.0 and MySQL.
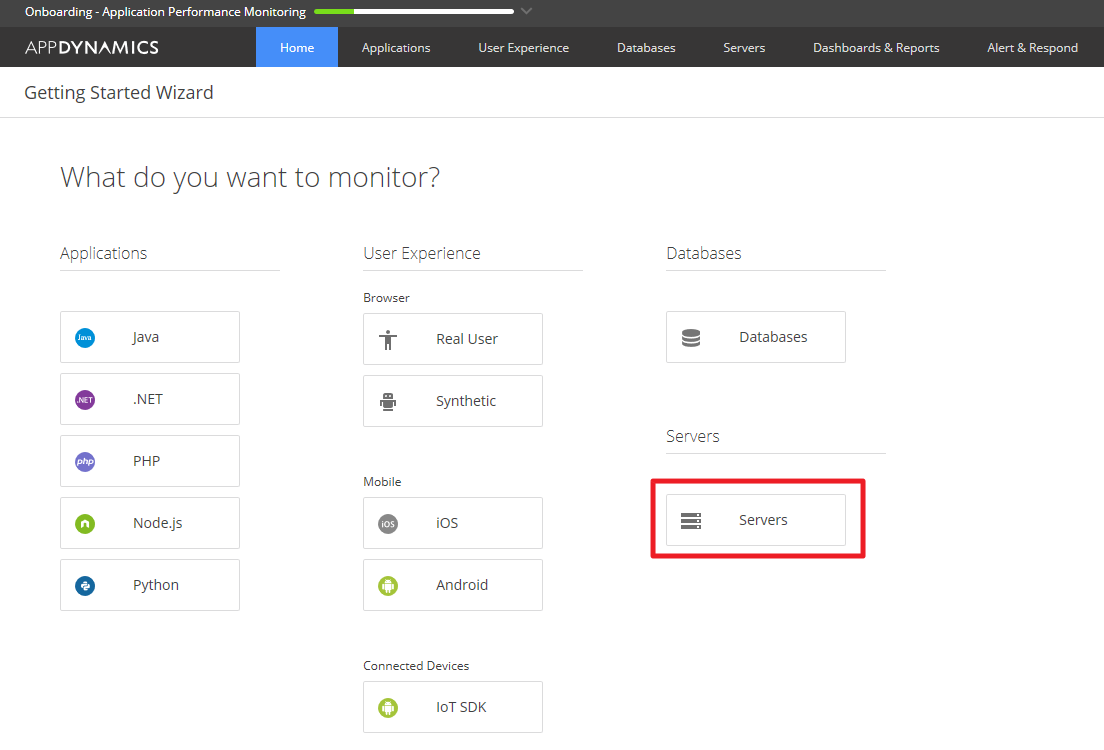
The first step is to install the PHP Agent the next step is to downloading the machine agent. Open your Appdynamics console and select the Getting Started Wizard.
Then click the Server button on the What do you want to monitor? screen.
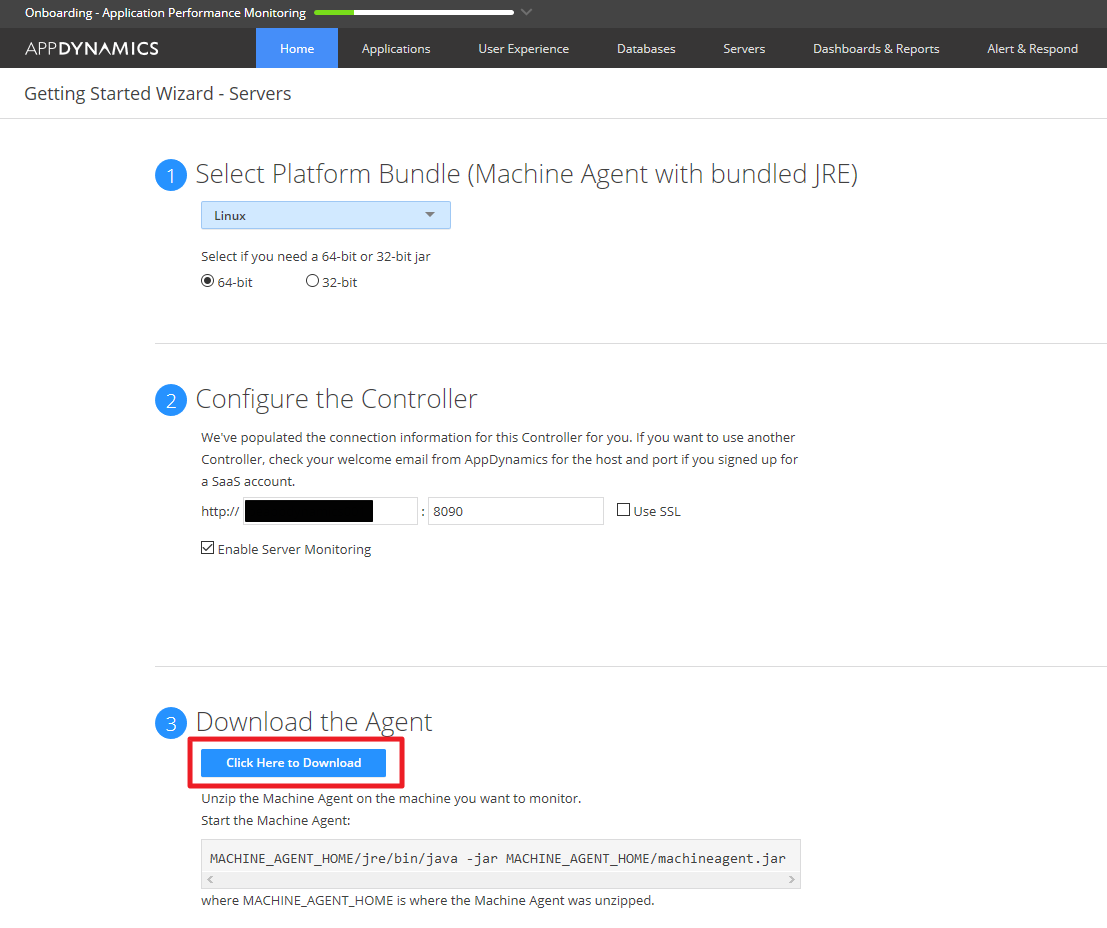
At the next screen check if the connection details are correct then click the click here to download button to acquire the Machine Agent.
Upload the downloaded zip file to your ubuntu server, unpack it to a desired location. This is where you want to run the machine agent from.
Check if the hostname of the appdynamics server is resolvable by simply pinging it, and also check if you can telnet into the port defined in the Configure the Controller step ( above ). The Machine Agent zip should contain the configuration files pre-configured with all the connection details, so in this case we do not have to do this manually. Run the machine agent as root using the following command:
[Your-agent-director]/bin/machine-agent &
root@HUAPPD001-P1:/app/appdynamics/machineagent/bin# ./machine-agent
Using java executable at /app/appdynamics/machineagent/jre/bin/java
Using Java Version [1.8.0_111] for Agent
Using Agent Version [Machine Agent v4.4.3.1214 GA Build Date 2018-04-28 05:12:10]
[INFO] Agent logging directory set to: [/app/appdynamics/machineagent]
Machine Agent Install Directory :/app/appdynamics/machineagent
Machine Agent Temp Directory :/app/appdynamics/machineagent/tmp
Tasks Root Directory :/app/appdynamics/machineagent/controlchannel
[INFO] Agent logging directory set to: [/app/appdynamics/machineagent]
Redirecting all logging statements to the configured logger
15:05:30.460 [system-thread-0] DEBUG com.appdynamics.common.framework.util.EmbeddedModeSecurityManager - Installed
15:05:30.490 [system-thread-0] INFO com.appdynamics.analytics.agent.AnalyticsAgent - Starting analytics agent with arguments [-p, /app/appdynamics/machineagent/monitors/analytics-agent/conf/analytics-agent.properties, -yr, analytics-agent.yml]
Started AppDynamics Machine Agent Successfully.
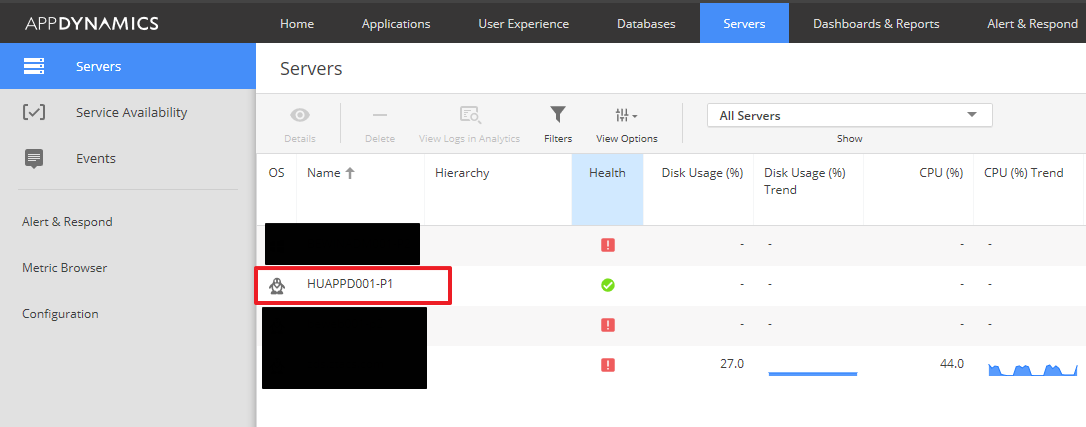
Once the agent is started it should automatically show up on the appdynamics console in the servers section.
Click on the machine’s name to open the detailed OS monitoring dashboard.
If you run into connection errors you can check and change the connection settings in the configuration file:
[Your-agent-director]/conf/controller-info.xml
Assign the machine agent automatically to an application and to its tiers and nodes
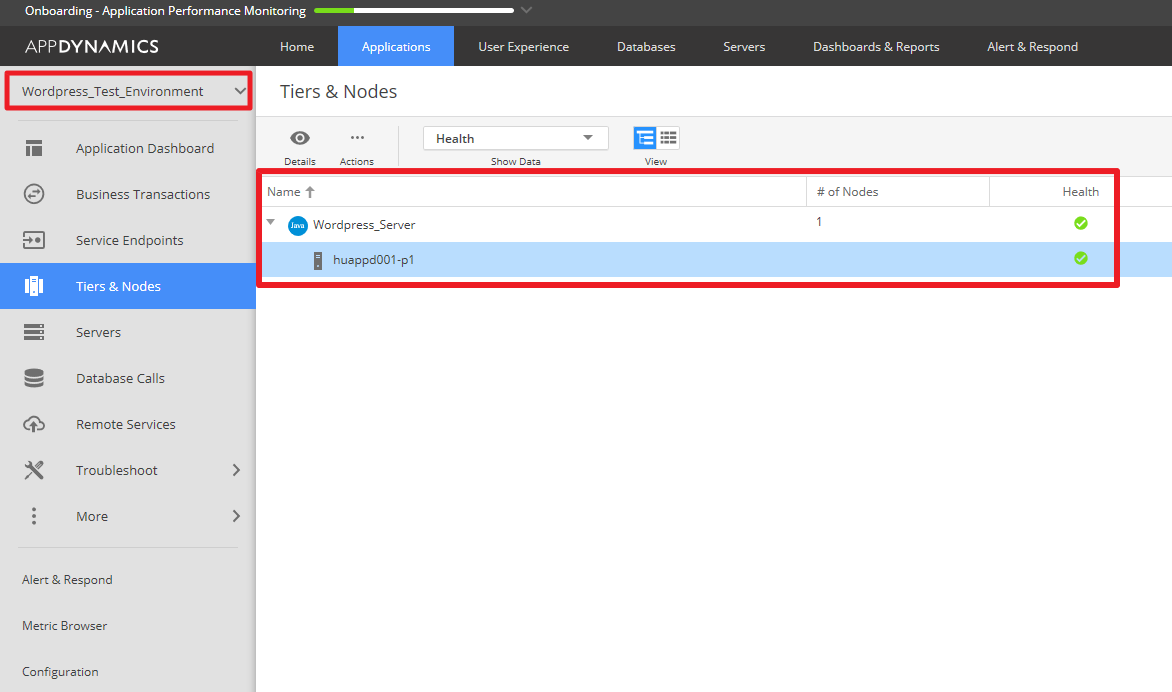
If you only want to use the machine agent on this server, you can hard wire the Application, Tier and Node details in the contoller-info.xml. Please note that if you use for example the PHP Agent on the same box this might stop the PHP Agent to connect to the controller.
There is no need to create the tiers and nodes manually they will be created on the dashboard automatically. We only added the WordPress_Test_Environment Application before the agent assignment. You will need to add the following to the controller-info.xml configuration file:
Change the name of the application, tier and node according to your specifications and restart the agent. Once the agent is restarted navigate into the application and verify if the machine agent has been added successfully.
We ran into this issue that the proper MS SQL drivers for SLES/PHP are unavailable. There is no phpX-mssql package on the official development media to install, therefore we had to find an alternative solution to access and write data into an MS SQL database from our SLES server.
After some research we decided to set up ODBC on SLES to see if that is working. You need to follow the steps below to install and enable ODBC on your SLES Linux Server.
Install the odbc driver packages from the official SLES 11 Media using zypper.If you do not have a compiler installed also install gcc.
zypper install unixODBC unixODBC-devel gcc
Since there is no freetds package available on the installation media we need to compile that ourselves. Download the installation media from http://www.freetds.org/, upload it to your server and unpack it to a location of your choice. Run the following commands from the directory where you unpacked freedts.
./configuremakemake install
Now edit the tds configuration file called freetds.conf. Located in /usr/local/etc/ and add the following to the end of the file end of the file and modify the host, port and version number to your requirements.
[sql-server]
 host = 192.168.0.105
 port = 1433
 tds version = 7.0
Now test if you can connect to the database server. Make sure that the server listens on port 1433 and you have the relevant user id and password.
tsql -S sql-server -U sa -P ********
 locale is "LC_CTYPE=en_US.UTF-8;LC_NUMERIC=C;LC_TIME=C;LC_COLLATE=C;LC_MONETARY=C;LC_MESSAGES=C;LC_PAPER=C;LC_NAME=C;LC_ADDRESS=C;LC_TELEPHONE=C;LC_MEASUREMENT=C;LC_IDENTIFICATION=C"
 locale charset is "UTF-8"
 using default charset "UTF-8"
 1>
If you do not see any error messages at this stage your connection is working. The next step is to modify the odbc configuration files. First we will do the drivers file. Edit the /etc/unixODBC/odbcinst.ini file by adding the following:
The libtdsodbc.so and libtdsS.so files might be on a different location on your installation check them before you add the lines.
The last step is to add the server information into the odbc.ini file which is located also in /etc/unixODBC directory. Add the following and modify the database name and port if required.
Now run isql to check if your configuration is correct. You have to use the name of the odbc connection after the isql command. In our case this was DsPcDb.
We came across the requirement to manipulate DB2 using PHP scripts. In order to be able to do that you need to the DB2 libraries installed on your machine. First of all install DB2 Express ( desired version, we used 11.1 ). Make sure you are installing the development libraries with the product as you will need this when you compile the DB2 PHP libraries. Once the server is installed check out the content of the following directory /home/db2inst1/sqllib/include/ if you see a bunch of files in there you have the development pack installed and you are good to go. if you used a different instance name obviously check in there 🙂
The following command sequence will get the rest sorted, we assume you already have php installed on your machine.
yum install php-pear
yum install php-devel
yum install gcc
pecl install ibm_db2
The installer will ask where the DB2 directories are located, just define the directory of your instance. Since we have db2inst1 as the instance the DB2 directory is located at /home/db2inst1/sqllib.
The installer will now compile the PHP libraries. Once it is done just add extension=ibm_db2.so into your php.ini file and you are good to go.
We run into the CTRA Server: no transports available, ffffffff Server shutting down issue recently on both our Windows and Linux servers. This might happen when the agent starts and the only communication protocol enabled is ip.spipe. The agent doesn’t connect in fact it shuts down after this error message like in this example:
(59D09A0D.0077-1:kraaumsg.cpp,107,"CTRA_msg_no_transports") CTRA Server: no transports available, ffffffff. Server shutting down
(59D09A0D.0078-1:kraafmn.cpp,787,"kglpsrvr") RegisterHandlers() returned error code: -1!
(59D09A0D.0079-1:kraafmn.cpp,788,"kglpsrvr") Ignoring server start-up request!
(59D09A0D.007A-1:kraaumsg.cpp,143,"CTRA_msg_server_exit_status") CTRA Server:  exit status, ffffffff
(59D09A0D.007B-B:signalmanager.cpp,524,"managerThread") Termination signal received.  Exiting...
(59D09A0D.007C-B:khdxprts.cpp,1760,"KHD_stopStatusMgr")  CTExporterStatus object is unavailable!
(59D09A0D.007D-B:kscqueue.cpp,200,"stop") Successfully stopped Audit worker thread
(59D09A0E.0000-C:kcacmdunx.cpp,273,"executeCmd") Shutdown -- before sleep.
(59D09A0E.0001-C:kcacmdunx.cpp,364,"executeCmd") Shutdown processing.
(59D09A0E.0002-C:kcacmdunx.cpp,264,"executeCmd") Shutdown -- before sleep.
(59D09A0E.0003-C:kcacmdunx.cpp,364,"executeCmd") Shutdown processing.
In both cases the solution is very simple.
Linux / Unix
The issue was due to the fact that our custom certificates expired, once the certificates were re-created, copied across and both the remote TEMS and the Linux OS agent restarted, the problem went away.
Windows
On windows the issue was a missing file after upgrading to Fixpack 7. Once the kdebe.dll file is copied from ITM\TMAITM6_x64 to ITM\GSK8_x64\lib64
the problem was solved.